קורס אמבדד – RB19-08 מבוא למיקרובקרים – בקרת מנוע , שימוש בבינה מלאכותית
שיעור זה נתרגל מחרוזות "שיפעלו" אלקטרוניקה , שלמדנו בהרצאות קודמות .
תרגיל כיתה : בניית קוד תוכנה עלי די בינה מלאכותית
0. תרגיל כיתה בנה תכונה ב chatGPT – יש לבקש – להקליד מהבינה מלאכותית הכל בשפה האנגלית
0.1 יש לכתוב במפורש את הבמילים "esp32 Arduino code"
0.2 פין 2 מחובר ללחצן שמוגדר ב PULL UP
0.3 כאשר נלחץ על הלחצן button נשלחת הודעה לטרמינל – לחצן נלחץ
0.4 הרץ את המעגל ב wokwi לפי הקוד של הבינה מלאכותי
0.5 בקש מהבינה מלאכותית להוסיף לד , כאשר הכפתור נלחץ נלדק גם לד – בנה והרץ תוכנית
0.6 בצע מספר שגיעות בקוד , העתק את הקוד ובקש מהבינה המלאותית לתקן את הקוד FIX CODE ואז הוסף באותו שיחה את הקוד .
תרגיל כיתה – חזרה על מחרוזות
- הרץ את הןד הבא בסביבית WOKWI הוסף לד ונגד לפי הצורך – Serial.readStringUntil('\n')
|
1 2 3 4 5 6 7 8 9 10 11 12 13 14 15 16 17 18 19 20 21 22 23 24 25 |
const int ledPin = 2; // Pin connected to the LED void setup() { Serial.begin(9600); pinMode(ledPin, OUTPUT); digitalWrite(ledPin, LOW); // Turn off the LED initially } void loop() { if (Serial.available() > 0) { String command = Serial.readStringUntil('\n'); command.trim(); // Remove leading and trailing whitespaces // Process the received command if (command == "on") { digitalWrite(ledPin, HIGH); // Turn on the LED Serial.println("LED is ON"); } else if (command == "off") { digitalWrite(ledPin, LOW); // Turn off the LED Serial.println("LED is OFF"); } else { Serial.println("Invalid command. Available commands: 'on' and 'off'"); } } } |
1.1. בנה את את המעגל בערכה והרץ את קוד
2 הרץ את הקוד הבא על המעגל בסאיף 1
|
1 2 3 4 5 6 7 8 9 10 11 12 13 14 15 16 17 18 19 20 21 22 23 24 25 26 27 28 29 30 31 32 |
const int ledPin = 2; // Pin connected to the LED bool ledState = false; // Current state of the LED void setup() { Serial.begin(9600); pinMode(ledPin, OUTPUT); digitalWrite(ledPin, LOW); // Turn off the LED initially } void loop() { if (Serial.available() > 0) { String command = Serial.readStringUntil('\n'); command.trim(); // Remove leading and trailing whitespaces // Process the received command using switch-select structure select(command) { case "on": digitalWrite(ledPin, HIGH); // Turn on the LED ledState = true; Serial.println("LED is ON"); break; case "off": digitalWrite(ledPin, LOW); // Turn off the LED ledState = false; Serial.println("LED is OFF"); break; default: Serial.println("Invalid command. Available commands: 'on' and 'off'"); break; } } } |
3.וצרוב אותה למיקרובקר
שים לב לקטע קוד הבא :

3.1 הקלד את הביטו XSD1SD
3.2 הקלד את הביטוי nmi2
3.3 הסבר מה קרה בתוכנית
|
1 2 3 4 5 6 7 8 9 10 11 12 13 14 15 16 17 18 19 20 21 22 23 24 25 26 27 28 29 30 31 32 33 34 35 36 37 38 39 40 41 42 43 |
const int ledPin = 2; // Pin connected to the LED bool ledState = false; // Current state of the LED void setup() { Serial.begin(9600); pinMode(ledPin, OUTPUT); digitalWrite(ledPin, LOW); // Turn off the LED initially } void loop() { if (Serial.available() > 0) { int command = Serial.parseInt(); // Read the incoming numeric command // Process the received command using select-case structure switch (command) { case 1: // Command 1 to turn the LED on digitalWrite(ledPin, HIGH); // Turn on the LED ledState = true; Serial.println("LED is ON"); break; case 2: // Command 2 to turn the LED off digitalWrite(ledPin, LOW); // Turn off the LED ledState = false; Serial.println("LED is OFF"); break; case 3: // Command 3 to get the current LED state if (ledState) { Serial.println("LED is currently ON"); } else { Serial.println("LED is currently OFF"); } break; default: Serial.println("Invalid command. Available commands: 1 (ON), 2 (OFF), 3 (CURRENT)"); break; } // Read the remaining characters from the serial buffer to clear it while (Serial.available() > 0) { char _ = Serial.read(); } } } |
4. תקן את התוכנית הבאה וצרוב אותה למיקרובקר
https://wokwi.com/projects/371088330455622657

4. דוגמא 1 תקשרות PC טרמניל מול בקר
|
1 2 3 4 5 6 7 8 9 10 11 12 13 14 15 16 17 18 19 20 21 22 23 24 25 26 27 28 29 30 31 32 33 34 35 36 37 38 39 40 41 42 43 44 45 46 47 48 49 50 51 52 53 54 55 56 57 58 59 60 61 62 63 64 65 66 67 68 69 70 71 72 73 74 75 76 77 78 79 80 81 82 83 84 85 86 87 88 89 90 91 92 93 94 95 96 97 98 99 100 101 102 103 104 105 106 107 108 109 110 111 112 113 114 115 116 117 118 119 120 121 122 123 124 125 126 |
// Motor control pins const int motor1EnablePin = 17; // L298 ENA pin (Enable pin for motor 1) const int motor1Input1 = 2; // L298 IN1 pin for motor 1 const int motor1Input2 = 15; // L298 IN2 pin for motor 1 const int motor2EnablePin = 16; // L298 ENB pin (Enable pin for motor 2) const int motor2Input1 = 4; // L298 IN3 pin for motor 2 const int motor2Input2 = 0; // L298 IN4 pin for motor 2 void setup() { Serial.begin(115200); // Set the motor control pins as outputs pinMode(motor1EnablePin, OUTPUT); pinMode(motor1Input1, OUTPUT); pinMode(motor1Input2, OUTPUT); pinMode(motor2EnablePin, OUTPUT); pinMode(motor2Input1, OUTPUT); pinMode(motor2Input2, OUTPUT); // Initialize the motors to a stopped state motorsStop(); } void loop() { // Print the status of the motors to the serial monitor Serial.println("Motors moving forward..."); // Run both motors forward for a few seconds motorsForward(); delay(1500); // Print the status of the motors to the serial monitor Serial.println("Motors moving backward..."); // Run both motors backward for a few seconds motorsBackward(); delay(1500); // Print the status of the motors to the serial monitor Serial.println("Motors turning right..."); // Move motors to the right for a short while motorsRight(); delay(2500); // Print the status of the motors to the serial monitor Serial.println("Motors turning left..."); // Move motors to the left for a short while motorsLeft(); delay(2500); // Print the status of the motors to the serial monitor Serial.println("Motors stopped..."); // Stop both motors for a short while motorsStop(); delay(3000); } // Function to make both motors move forward void motorsForward() { // Motor 1 digitalWrite(motor1Input1, HIGH); digitalWrite(motor1Input2, LOW); analogWrite(motor1EnablePin, 255); // You can adjust the speed by changing the value (0-255) // Motor 2 digitalWrite(motor2Input1, HIGH); digitalWrite(motor2Input2, LOW); analogWrite(motor2EnablePin, 255); // You can adjust the speed by changing the value (0-255) } // Function to make both motors move backward void motorsBackward() { // Motor 1 digitalWrite(motor1Input1, LOW); digitalWrite(motor1Input2, HIGH); analogWrite(motor1EnablePin, 255); // You can adjust the speed by changing the value (0-255) // Motor 2 digitalWrite(motor2Input1, LOW); digitalWrite(motor2Input2, HIGH); analogWrite(motor2EnablePin, 255); // You can adjust the speed by changing the value (0-255) } // Function to make both motors turn right void motorsRight() { // Motor 1 digitalWrite(motor1Input1, LOW); digitalWrite(motor1Input2, HIGH); analogWrite(motor1EnablePin, 200); // You can adjust the speed by changing the value (0-255) // Motor 2 digitalWrite(motor2Input1, HIGH); digitalWrite(motor2Input2, LOW); analogWrite(motor2EnablePin, 200); // You can adjust the speed by changing the value (0-255) } // Function to make both motors turn left void motorsLeft() { // Motor 1 digitalWrite(motor1Input1, HIGH); digitalWrite(motor1Input2, LOW); analogWrite(motor1EnablePin, 200); // You can adjust the speed by changing the value (0-255) // Motor 2 digitalWrite(motor2Input1, LOW); digitalWrite(motor2Input2, HIGH); analogWrite(motor2EnablePin, 200); // You can adjust the speed by changing the value (0-255) } // Function to stop both motors void motorsStop() { // Motor 1 digitalWrite(motor1Input1, LOW); digitalWrite(motor1Input2, LOW); analogWrite(motor1EnablePin, 0); // Set the speed to 0 to stop the motor // Motor 2 digitalWrite(motor2Input1, LOW); digitalWrite(motor2Input2, LOW); analogWrite(motor2EnablePin, 0); // Set the speed to 0 to stop the motor } |
4.1 דוגמא 2 : תקשרות PC טרמניל מול בקר – פיקוד לפי תו- שים לב – (אין שימוש ב )
|
1 2 3 4 5 6 7 8 9 10 11 12 13 14 15 16 17 18 19 20 21 22 23 24 25 26 27 28 29 30 31 32 33 34 35 36 37 38 39 40 41 42 43 44 45 46 47 48 49 50 51 52 53 54 55 56 57 58 59 60 61 62 63 64 65 66 67 68 69 70 71 72 73 74 75 76 77 78 79 80 81 82 83 84 85 86 87 88 89 90 91 92 93 94 95 96 97 98 99 100 101 102 103 104 105 106 107 108 109 110 111 112 113 114 115 116 117 118 119 120 121 122 |
// Motor control pins const int motor1EnablePin = 17; // L298 ENA pin (Enable pin for motor 1) const int motor1Input1 = 2; // L298 IN1 pin for motor 1 const int motor1Input2 = 15; // L298 IN2 pin for motor 1 const int motor2EnablePin = 16; // L298 ENB pin (Enable pin for motor 2) const int motor2Input1 = 4; // L298 IN3 pin for motor 2 const int motor2Input2 = 0; // L298 IN4 pin for motor 2 void setup() { Serial.begin(115200); // Set the motor control pins as outputs pinMode(motor1EnablePin, OUTPUT); pinMode(motor1Input1, OUTPUT); pinMode(motor1Input2, OUTPUT); pinMode(motor2EnablePin, OUTPUT); pinMode(motor2Input1, OUTPUT); pinMode(motor2Input2, OUTPUT); // Initialize the motors to a stopped state motorsStop(); } void loop() { // Check if there's incoming data from the serial monitor if (Serial.available() > 0) { // Read the incoming command char command = Serial.read(); // Execute the corresponding motor control based on the command received switch (command) { case '8': // '8' for forward motorsForward(); Serial.println("Moving forward..."); break; case '2': // '2' for backward motorsBackward(); Serial.println("Moving backward..."); break; case '6': // '6' for right motorsRight(); Serial.println("Turning right..."); break; case '4': // '4' for left motorsLeft(); Serial.println("Turning left..."); break; case '5': // '5' stop // Stop if an invalid command is received motorsStop(); Serial.println("Invalid command. Motors stopped."); break; } } } // Function to make both motors move forward void motorsForward() { // Motor 1 digitalWrite(motor1Input1, HIGH); digitalWrite(motor1Input2, LOW); analogWrite(motor1EnablePin, 255); // You can adjust the speed by changing the value (0-255) // Motor 2 digitalWrite(motor2Input1, HIGH); digitalWrite(motor2Input2, LOW); analogWrite(motor2EnablePin, 255); // You can adjust the speed by changing the value (0-255) } // Function to make both motors move backward void motorsBackward() { // Motor 1 digitalWrite(motor1Input1, LOW); digitalWrite(motor1Input2, HIGH); analogWrite(motor1EnablePin, 255); // You can adjust the speed by changing the value (0-255) // Motor 2 digitalWrite(motor2Input1, LOW); digitalWrite(motor2Input2, HIGH); analogWrite(motor2EnablePin, 255); // You can adjust the speed by changing the value (0-255) } // Function to make both motors turn right void motorsRight() { // Motor 1 digitalWrite(motor1Input1, LOW); digitalWrite(motor1Input2, HIGH); analogWrite(motor1EnablePin, 200); // You can adjust the speed by changing the value (0-255) // Motor 2 digitalWrite(motor2Input1, HIGH); digitalWrite(motor2Input2, LOW); analogWrite(motor2EnablePin, 200); // You can adjust the speed by changing the value (0-255) } // Function to make both motors turn left void motorsLeft() { // Motor 1 digitalWrite(motor1Input1, HIGH); digitalWrite(motor1Input2, LOW); analogWrite(motor1EnablePin, 200); // You can adjust the speed by changing the value (0-255) // Motor 2 digitalWrite(motor2Input1, LOW); digitalWrite(motor2Input2, HIGH); analogWrite(motor2EnablePin, 200); // You can adjust the speed by changing the value (0-255) } // Function to stop both motors void motorsStop() { // Motor 1 digitalWrite(motor1Input1, LOW); digitalWrite(motor1Input2, LOW); analogWrite(motor1EnablePin, 0); // Set the speed to 0 to stop the motor // Motor 2 digitalWrite(motor2Input1, LOW); digitalWrite(motor2Input2, LOW); analogWrite(motor2EnablePin, 0); // Set the speed to 0 to stop the motor } |
4.2 דוגמא 5: תקשרות PC טרמינל מול בקר – תזכורת new iine = \n
|
1 2 3 4 5 6 7 8 9 10 11 12 13 14 15 16 17 18 19 20 21 22 23 24 25 26 27 28 29 30 31 32 33 34 35 36 37 38 39 40 41 42 43 44 45 46 47 48 49 50 51 52 53 54 55 56 57 58 59 60 61 62 63 64 65 66 67 68 69 70 71 72 73 74 75 76 77 78 79 80 81 82 83 84 85 86 87 88 89 90 91 92 93 94 95 96 97 98 99 100 101 102 103 104 105 106 107 108 109 110 111 112 113 114 115 116 117 118 119 120 121 122 |
// Motor control pins const int motor1EnablePin = 17; // L298 ENA pin (Enable pin for motor 1) const int motor1Input1 = 2; // L298 IN1 pin for motor 1 const int motor1Input2 = 15; // L298 IN2 pin for motor 1 const int motor2EnablePin = 16; // L298 ENB pin (Enable pin for motor 2) const int motor2Input1 = 4; // L298 IN3 pin for motor 2 const int motor2Input2 = 0; // L298 IN4 pin for motor 2 void setup() { Serial.begin(115200); // Set the motor control pins as outputs pinMode(motor1EnablePin, OUTPUT); pinMode(motor1Input1, OUTPUT); pinMode(motor1Input2, OUTPUT); pinMode(motor2EnablePin, OUTPUT); pinMode(motor2Input1, OUTPUT); pinMode(motor2Input2, OUTPUT); // Initialize the motors to a stopped state motorsStop(); } void loop() { // Check if there's incoming data from the serial monitor if (Serial.available() > 0) { // Read the incoming command as a string String command = Serial.readStringUntil('\n'); // Execute the corresponding motor control based on the command received if ( (command == "stop") || (command == "0") ) { motorsStop(); Serial.println("Motors stopped."); } else if( (command == "right") || (command == "6") ) { motorsRight(); Serial.println("Turning right..."); } else if ( (command == "left") || (command == "4") ) { motorsLeft(); Serial.println("Turning left..."); } else if (command == "8") { motorsForward(); Serial.println("Moving forward..."); } else if (command == "4") { motorsBackward(); Serial.println("Moving backward..."); } else { Serial.println("Invalid command. Motors stopped."); } } } // Function to make both motors move forward void motorsForward() { // Motor 1 digitalWrite(motor1Input1, HIGH); digitalWrite(motor1Input2, LOW); analogWrite(motor1EnablePin, 255); // You can adjust the speed by changing the value (0-255) // Motor 2 digitalWrite(motor2Input1, HIGH); digitalWrite(motor2Input2, LOW); analogWrite(motor2EnablePin, 255); // You can adjust the speed by changing the value (0-255) } // Function to make both motors move backward void motorsBackward() { // Motor 1 digitalWrite(motor1Input1, LOW); digitalWrite(motor1Input2, HIGH); analogWrite(motor1EnablePin, 255); // You can adjust the speed by changing the value (0-255) // Motor 2 digitalWrite(motor2Input1, LOW); digitalWrite(motor2Input2, HIGH); analogWrite(motor2EnablePin, 255); // You can adjust the speed by changing the value (0-255) } // Function to make both motors turn right void motorsRight() { // Motor 1 digitalWrite(motor1Input1, LOW); digitalWrite(motor1Input2, HIGH); analogWrite(motor1EnablePin, 200); // You can adjust the speed by changing the value (0-255) // Motor 2 digitalWrite(motor2Input1, HIGH); digitalWrite(motor2Input2, LOW); analogWrite(motor2EnablePin, 200); // You can adjust the speed by changing the value (0-255) } // Function to make both motors turn left void motorsLeft() { // Motor 1 digitalWrite(motor1Input1, HIGH); digitalWrite(motor1Input2, LOW); analogWrite(motor1EnablePin, 200); // You can adjust the speed by changing the value (0-255) // Motor 2 digitalWrite(motor2Input1, LOW); digitalWrite(motor2Input2, HIGH); analogWrite(motor2EnablePin, 200); // You can adjust the speed by changing the value (0-255) } // Function to stop both motors void motorsStop() { // Motor 1 digitalWrite(motor1Input1, LOW); digitalWrite(motor1Input2, LOW); analogWrite(motor1EnablePin, 0); // Set the speed to 0 to stop the motor // Motor 2 digitalWrite(motor2Input1, LOW); digitalWrite(motor2Input2, LOW); analogWrite(motor2EnablePin, 0); // Set the speed to 0 to stop the motor } |
5. תרגיל כיתה – עבור מנוע אחד , בקר
1.הוסף לבקר המנוע פיקוד דרך בלוטוס לפי שיטה של תווים ומחרוזת משלוב
2.הוסף פלט למסך OLED ב I2C
3.הוסף גירוסקופ
6. קצת אלקטרוניקה דיודה
7. back emf
8. RFID ושימוש ב SPI
https://esp32io.com/tutorials/esp32-rfid-nfc
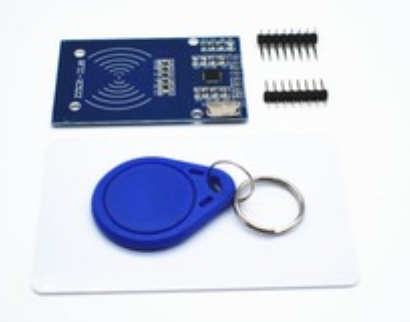
8.1 התקן את הספירה :
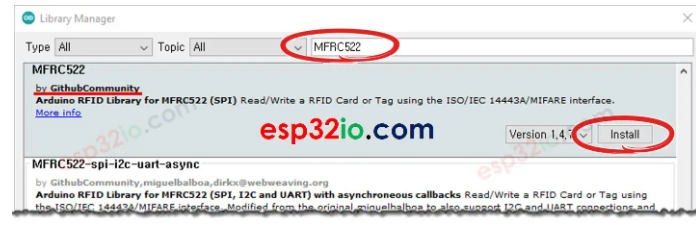
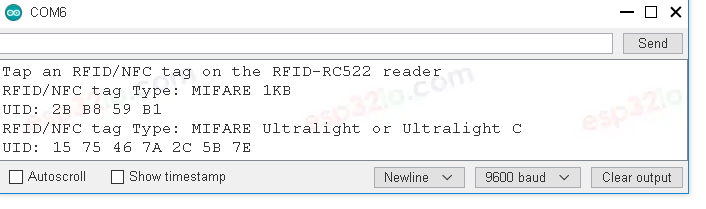
8.2 הפעל את הקוד :
|
1 2 3 4 5 6 7 8 9 10 11 12 13 14 15 16 17 18 19 20 21 22 23 24 25 26 27 28 29 30 31 32 33 34 35 36 37 38 39 40 41 42 43 44 |
/* * This ESP32 code is created by esp32io.com * * This ESP32 code is released in the public domain * * For more detail (instruction and wiring diagram), visit https://esp32io.com/tutorials/esp32-rfid-nfc */ #include <SPI.h> #include <MFRC522.h> #define SS_PIN 5 // ESP32 pin GPIO5 #define RST_PIN 27 // ESP32 pin GPIO27 MFRC522 rfid(SS_PIN, RST_PIN); void setup() { Serial.begin(9600); SPI.begin(); // init SPI bus rfid.PCD_Init(); // init MFRC522 Serial.println("Tap an RFID/NFC tag on the RFID-RC522 reader"); } void loop() { if (rfid.PICC_IsNewCardPresent()) { // new tag is available if (rfid.PICC_ReadCardSerial()) { // NUID has been readed MFRC522::PICC_Type piccType = rfid.PICC_GetType(rfid.uid.sak); Serial.print("RFID/NFC Tag Type: "); Serial.println(rfid.PICC_GetTypeName(piccType)); // print UID in Serial Monitor in the hex format Serial.print("UID:"); for (int i = 0; i < rfid.uid.size; i++) { Serial.print(rfid.uid.uidByte[i] < 0x10 ? " 0" : " "); Serial.print(rfid.uid.uidByte[i], HEX); } Serial.println(); rfid.PICC_HaltA(); // halt PICC rfid.PCD_StopCrypto1(); // stop encryption on PCD } } } |
8.2 פלט קוד :