קורס אמבדד – RB19-07 מבוא למיקרובקרים – מבוא לתקשורת נתונים 2 – עולם ה IOT
עבודה עם I2C , תרגול התקנת ספריות וספקיות שונות מאותו רכיב
שימו לב
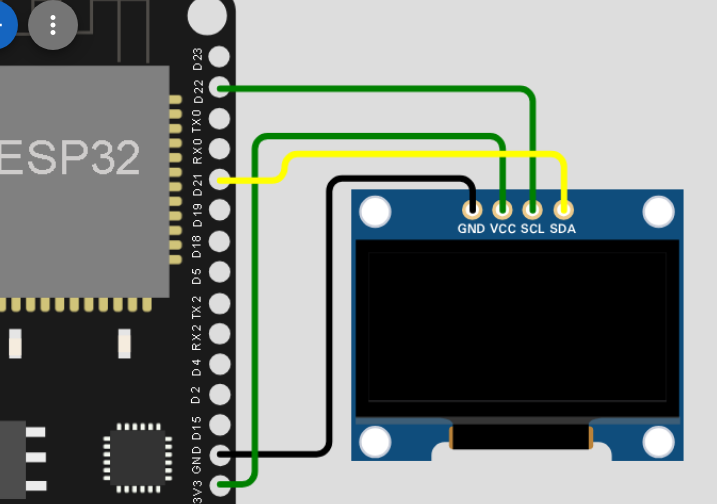
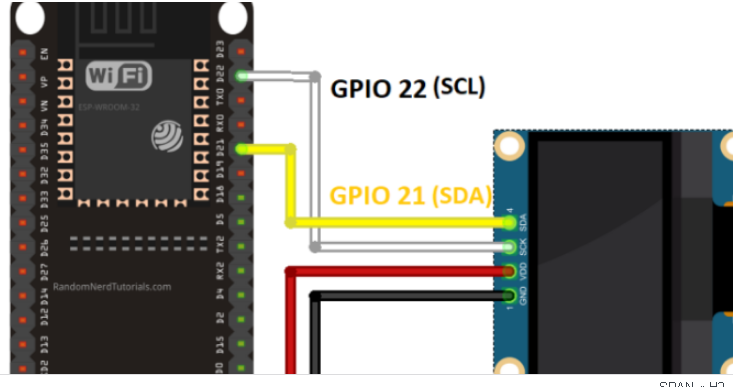
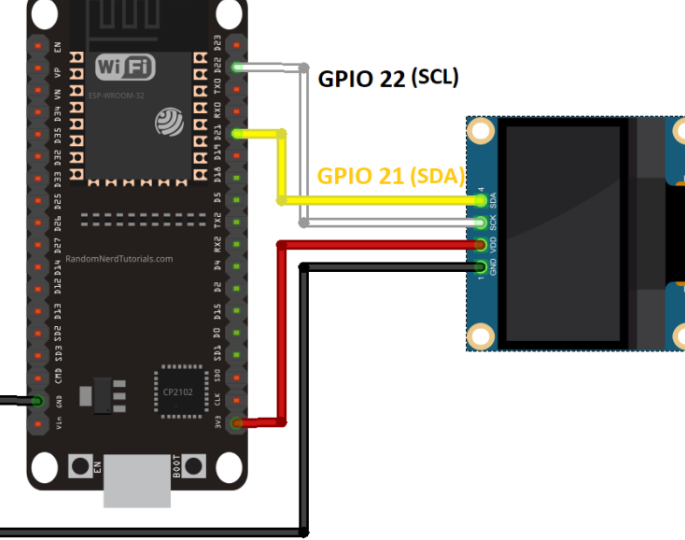
SCL — PIN 22
SDA — PIN 22
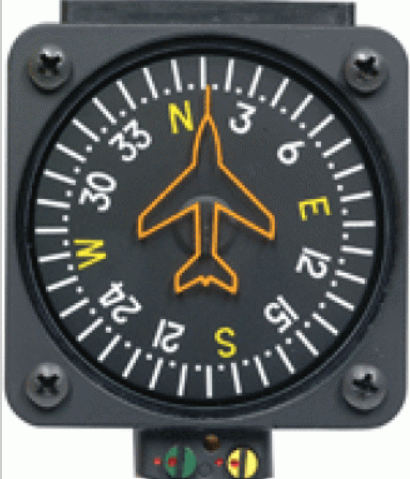
שימוש במגנומטר "מצפן" למערכות תעופה
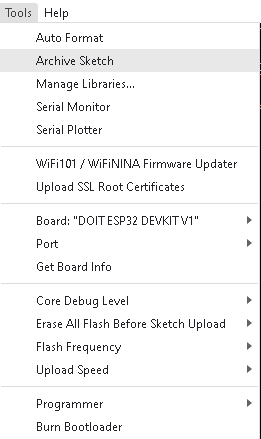
1.1 התקן את הספריה :
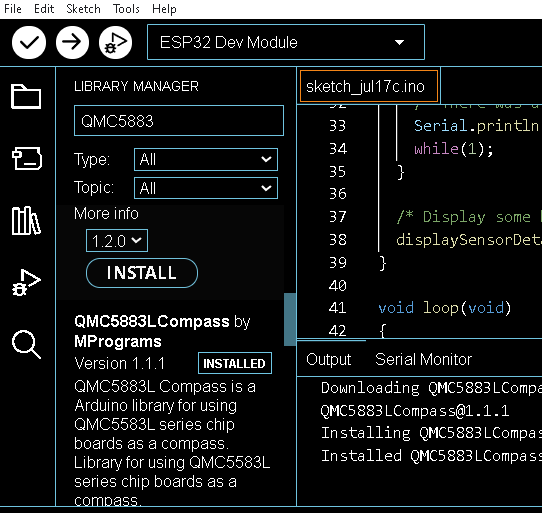
1.2 צרובו את התוכנה , שימו לב לקצב שידור 9600 בקוד ,
1.3. הפעל ללא מגנט ושנה כיוון רכיב ידנית
1.4 קרבו מגנט וראו שינויים
|
1 2 3 4 5 6 7 8 9 10 11 12 13 14 15 16 17 18 19 20 21 22 23 24 25 26 27 28 29 30 31 32 33 34 35 36 37 38 39 40 41 42 43 |
/* =============================================================================================================== QMC5883LCompass.h Library XYZ Example Sketch Learn more at [https://github.com/mprograms/QMC5883LCompass] This example shows how to get the XYZ values from the sensor. =============================================================================================================== Release under the GNU General Public License v3 [https://www.gnu.org/licenses/gpl-3.0.en.html] =============================================================================================================== */ #include <QMC5883LCompass.h> QMC5883LCompass compass; void setup() { Serial.begin(9600); compass.init(); } void loop() { int x, y, z; // Read compass values compass.read(); // Return XYZ readings x = compass.getX(); y = compass.getY(); z = compass.getZ(); Serial.print("X: "); Serial.print(x); Serial.print(" Y: "); Serial.print(y); Serial.print(" Z: "); Serial.print(z); Serial.println(); delay(250); } |
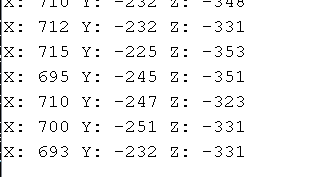
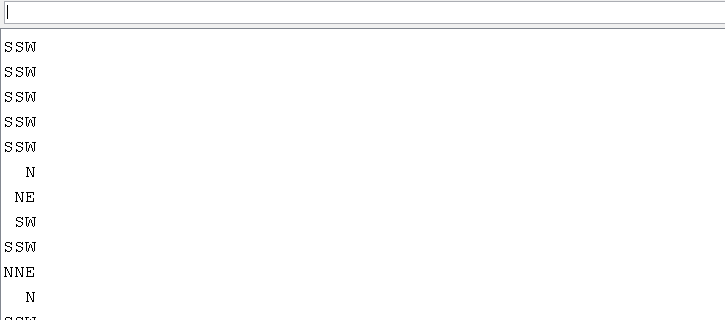
1.5 הפעל את התוכנה הבאה לקבלת כיוון של מצפן – מצפן טיסה
|
1 2 3 4 5 6 7 8 9 10 11 12 13 14 15 16 17 18 19 20 21 22 23 24 25 26 27 28 29 30 31 32 33 34 35 36 37 38 39 40 41 42 43 |
/* =============================================================================================================== QMC5883LCompass.h Library XYZ Example Sketch Learn more at [https://github.com/mprograms/QMC5883LCompass] This example shows how to get the XYZ values from the sensor. =============================================================================================================== Release under the GNU General Public License v3 [https://www.gnu.org/licenses/gpl-3.0.en.html] =============================================================================================================== */ #include <QMC5883LCompass.h> QMC5883LCompass compass; void setup() { Serial.begin(9600); compass.init(); } void loop() { int x, y, z; // Read compass values compass.read(); // Return XYZ readings x = compass.getX(); y = compass.getY(); z = compass.getZ(); Serial.print("X: "); Serial.print(x); Serial.print(" Y: "); Serial.print(y); Serial.print(" Z: "); Serial.print(z); Serial.println(); delay(250); } |
1.6 שימוש באזימוט
In compass navigation, azimuth refers to the horizontal angle measured clockwise from a reference direction, typically true north, to a specific point or object. It is used to determine the direction or bearing of an object or destination relative to the observer's position.
The azimuth is measured in degrees, with 0° representing the reference direction (e.g., true north) and increasing clockwise up to 360°, forming a complete circle. For example, an azimuth of 90° would correspond to due east, 180° to due south, and 270° to due west.
When using a compass, the azimuth is typically read by aligning the compass needle or dial with the magnetic north and then noting the degree marking on the compass housing or bezel. This reading indicates the azimuth or bearing of the observed object or desired direction.
It's important to note that there are different types of azimuths, such as magnetic azimuth (relative to magnetic north), true azimuth (relative to true north), and grid azimuth (relative to grid north, which is used in military maps). The type of azimuth used depends on the reference direction chosen and the purpose of the navigation.
1.6.1 הפעל את תוכנת האזימוט
|
1 2 3 4 5 6 7 8 9 10 11 12 13 14 15 16 17 18 19 20 21 22 23 24 25 26 27 28 29 30 31 32 33 34 35 36 37 38 |
/* =============================================================================================================== QMC5883LCompass.h Library Azimuth Example Sketch Learn more at [https://github.com/mprograms/QMC5883Compas] =============================================================================================================== v0.3 - June 12, 2019 Written by MRPrograms Github: [https://github.com/mprograms/] Release under the GNU General Public License v3 [https://www.gnu.org/licenses/gpl-3.0.en.html] =============================================================================================================== */ #include <QMC5883LCompass.h> QMC5883LCompass compass; void setup() { Serial.begin(9600); compass.init(); } void loop() { int a; // Read compass values compass.read(); // Return Azimuth reading a = compass.getAzimuth(); Serial.print("A: "); Serial.print(a); Serial.println(); delay(250); } |
מסך oled 0.96
|
1 2 3 4 5 6 7 8 9 10 11 12 13 14 15 16 17 18 19 20 21 22 23 24 25 26 27 28 29 30 31 |
#include <Wire.h> #include <Adafruit_GFX.h> #include <Adafruit_SSD1306.h> #define SCREEN_WIDTH 128 // OLED width, in pixels #define SCREEN_HEIGHT 64 // OLED height, in pixels // create an OLED display object connected to I2C Adafruit_SSD1306 oled(SCREEN_WIDTH, SCREEN_HEIGHT, &Wire, -1); void setup() { Serial.begin(9600); // initialize OLED display with I2C address 0x3C if (!oled.begin(SSD1306_SWITCHCAPVCC, 0x3C)) { Serial.println(F("failed to start SSD1306 OLED")); while (1); } delay(2000); // wait two seconds for initializing oled.clearDisplay(); // clear display oled.setTextSize(1); // set text size oled.setTextColor(WHITE); // set text color oled.setCursor(0, 2); // set position to display (x,y) oled.println("Robotronix"); // set text oled.display(); // display on OLED } void loop() { } |
2.0 .מסך OLED 0.96 התקן את הספריה כמו ב WOKI
2.1 כתוב למסך I LOVE A.I
2.01 .מסך OLED 1.3
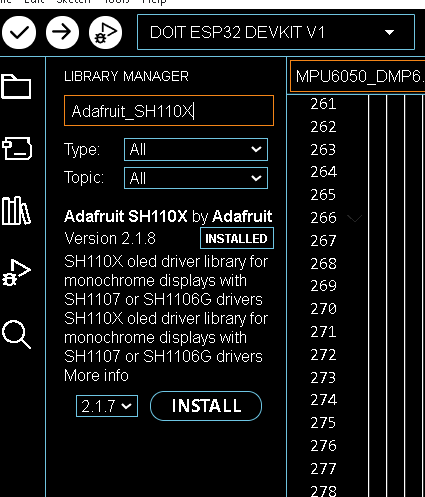
נתרגל חיבור מסך OLED מסוג 1.3 אינצ – שימו לב זה לא מסך 0.96 שתורגל בסימלטור לכן נתקין לו ספריות שיודעות להתאים לו
|
1 2 |
#include <Adafruit_GFX.h> #include <Adafruit_SH110X.h> |
2.1 נוסיף את הספריה
1.2 Adafruit_SH110X לחצו על INSTALL
2.3 ואת הספריה Adafruit_GFX לחצו על INSTALL
2.4 נפעיל את קוד התוכנה
|
1 2 3 4 5 6 7 8 9 10 11 12 13 14 15 16 17 18 19 20 21 22 23 24 25 26 27 28 29 30 31 32 33 34 35 36 37 38 39 40 41 42 43 44 45 46 47 48 49 50 51 52 53 54 55 56 57 58 59 60 61 62 63 64 65 66 67 68 69 70 71 72 73 74 75 76 77 78 79 80 81 82 83 84 85 86 87 88 89 90 91 92 93 94 95 96 97 98 99 100 101 102 103 104 105 106 107 108 109 110 111 112 113 114 115 116 117 118 119 120 121 122 123 124 125 126 127 128 129 130 131 132 133 134 135 136 137 138 139 140 141 142 143 144 145 146 147 148 149 150 151 152 153 154 155 156 157 158 159 160 161 162 163 164 165 166 167 168 169 170 171 172 173 174 175 176 177 178 179 180 181 182 183 184 185 186 187 188 189 190 191 192 193 194 195 196 197 198 199 200 201 202 203 204 205 206 207 208 209 210 211 212 213 214 215 216 217 218 219 220 221 222 223 224 225 226 227 228 229 230 231 232 233 234 235 236 237 238 239 240 241 242 243 244 245 246 247 248 249 250 251 252 253 254 255 256 257 258 259 260 261 262 263 264 265 266 267 268 269 270 271 272 |
#include <Wire.h> #include <Adafruit_GFX.h> #include <Adafruit_SH110X.h> /* Uncomment the initialize the I2C address , uncomment only one, If you get a totally blank screen try the other*/ #define i2c_Address 0x3c //initialize with the I2C addr 0x3C Typically eBay OLED's //#define i2c_Address 0x3d //initialize with the I2C addr 0x3D Typically Adafruit OLED's #define SCREEN_WIDTH 128 // OLED display width, in pixels #define SCREEN_HEIGHT 64 // OLED display height, in pixels #define OLED_RESET -1 // QT-PY / XIAO Adafruit_SH1106G display = Adafruit_SH1106G(SCREEN_WIDTH, SCREEN_HEIGHT, &Wire, OLED_RESET); #define NUMFLAKES 10 #define XPOS 0 #define YPOS 1 #define DELTAY 2 #define LOGO16_GLCD_HEIGHT 16 #define LOGO16_GLCD_WIDTH 16 static const unsigned char PROGMEM logo16_glcd_bmp[] = { B00000000, B11000000, B00000001, B11000000, B00000001, B11000000, B00000011, B11100000, B11110011, B11100000, B11111110, B11111000, B01111110, B11111111, B00110011, B10011111, B00011111, B11111100, B00001101, B01110000, B00011011, B10100000, B00111111, B11100000, B00111111, B11110000, B01111100, B11110000, B01110000, B01110000, B00000000, B00110000 }; void setup() { Serial.begin(9600); // Show image buffer on the display hardware. // Since the buffer is intialized with an Adafruit splashscreen // internally, this will display the splashscreen. delay(250); // wait for the OLED to power up display.begin(i2c_Address, true); // Address 0x3C default //display.setContrast (0); // dim display display.display(); delay(2000); // Clear the buffer. display.clearDisplay(); // draw a single pixel display.drawPixel(10, 10, SH110X_WHITE); // Show the display buffer on the hardware. // NOTE: You _must_ call display after making any drawing commands // to make them visible on the display hardware! display.display(); delay(2000); display.clearDisplay(); // text display tests display.setTextSize(1); display.setTextColor(SH110X_WHITE); display.setCursor(0, 0); display.println("www.robotronix.co.il "); display.setTextColor(SH110X_BLACK, SH110X_WHITE); // 'inverted' text display.println(3.141592); display.setCursor(0, 30); display.setTextSize(2); display.setTextColor(SH110X_WHITE); display.print("Learn A.i now"); display.display(); delay(2000); display.clearDisplay(); } void loop() { } void testdrawbitmap(const uint8_t *bitmap, uint8_t w, uint8_t h) { uint8_t icons[NUMFLAKES][3]; // initialize for (uint8_t f = 0; f < NUMFLAKES; f++) { icons[f][XPOS] = random(display.width()); icons[f][YPOS] = 0; icons[f][DELTAY] = random(5) + 1; Serial.print("x: "); Serial.print(icons[f][XPOS], DEC); Serial.print(" y: "); Serial.print(icons[f][YPOS], DEC); Serial.print(" dy: "); Serial.println(icons[f][DELTAY], DEC); } while (1) { // draw each icon for (uint8_t f = 0; f < NUMFLAKES; f++) { display.drawBitmap(icons[f][XPOS], icons[f][YPOS], bitmap, w, h, SH110X_WHITE); } display.display(); delay(200); // then erase it + move it for (uint8_t f = 0; f < NUMFLAKES; f++) { display.drawBitmap(icons[f][XPOS], icons[f][YPOS], bitmap, w, h, SH110X_BLACK); // move it icons[f][YPOS] += icons[f][DELTAY]; // if its gone, reinit if (icons[f][YPOS] > display.height()) { icons[f][XPOS] = random(display.width()); icons[f][YPOS] = 0; icons[f][DELTAY] = random(5) + 1; } } } } void testdrawchar(void) { display.setTextSize(1); display.setTextColor(SH110X_WHITE); display.setCursor(0, 0); for (uint8_t i = 0; i < 168; i++) { if (i == '\n') continue; display.write(i); if ((i > 0) && (i % 21 == 0)) display.println(); } display.display(); delay(1); } void testdrawcircle(void) { for (int16_t i = 0; i < display.height(); i += 2) { display.drawCircle(display.width() / 2, display.height() / 2, i, SH110X_WHITE); display.display(); delay(1); } } void testfillrect(void) { uint8_t color = 1; for (int16_t i = 0; i < display.height() / 2; i += 3) { // alternate colors display.fillRect(i, i, display.width() - i * 2, display.height() - i * 2, color % 2); display.display(); delay(1); color++; } } void testdrawtriangle(void) { for (int16_t i = 0; i < min(display.width(), display.height()) / 2; i += 5) { display.drawTriangle(display.width() / 2, display.height() / 2 - i, display.width() / 2 - i, display.height() / 2 + i, display.width() / 2 + i, display.height() / 2 + i, SH110X_WHITE); display.display(); delay(1); } } void testfilltriangle(void) { uint8_t color = SH110X_WHITE; for (int16_t i = min(display.width(), display.height()) / 2; i > 0; i -= 5) { display.fillTriangle(display.width() / 2, display.height() / 2 - i, display.width() / 2 - i, display.height() / 2 + i, display.width() / 2 + i, display.height() / 2 + i, SH110X_WHITE); if (color == SH110X_WHITE) color = SH110X_BLACK; else color = SH110X_WHITE; display.display(); delay(1); } } void testdrawroundrect(void) { for (int16_t i = 0; i < display.height() / 2 - 2; i += 2) { display.drawRoundRect(i, i, display.width() - 2 * i, display.height() - 2 * i, display.height() / 4, SH110X_WHITE); display.display(); delay(1); } } void testfillroundrect(void) { uint8_t color = SH110X_WHITE; for (int16_t i = 0; i < display.height() / 2 - 2; i += 2) { display.fillRoundRect(i, i, display.width() - 2 * i, display.height() - 2 * i, display.height() / 4, color); if (color == SH110X_WHITE) color = SH110X_BLACK; else color = SH110X_WHITE; display.display(); delay(1); } } void testdrawrect(void) { for (int16_t i = 0; i < display.height() / 2; i += 2) { display.drawRect(i, i, display.width() - 2 * i, display.height() - 2 * i, SH110X_WHITE); display.display(); delay(1); } } void testdrawline() { for (int16_t i = 0; i < display.width(); i += 4) { display.drawLine(0, 0, i, display.height() - 1, SH110X_WHITE); display.display(); delay(1); } for (int16_t i = 0; i < display.height(); i += 4) { display.drawLine(0, 0, display.width() - 1, i, SH110X_WHITE); display.display(); delay(1); } delay(250); display.clearDisplay(); for (int16_t i = 0; i < display.width(); i += 4) { display.drawLine(0, display.height() - 1, i, 0, SH110X_WHITE); display.display(); delay(1); } for (int16_t i = display.height() - 1; i >= 0; i -= 4) { display.drawLine(0, display.height() - 1, display.width() - 1, i, SH110X_WHITE); display.display(); delay(1); } delay(250); display.clearDisplay(); for (int16_t i = display.width() - 1; i >= 0; i -= 4) { display.drawLine(display.width() - 1, display.height() - 1, i, 0, SH110X_WHITE); display.display(); delay(1); } for (int16_t i = display.height() - 1; i >= 0; i -= 4) { display.drawLine(display.width() - 1, display.height() - 1, 0, i, SH110X_WHITE); display.display(); delay(1); } delay(250); display.clearDisplay(); for (int16_t i = 0; i < display.height(); i += 4) { display.drawLine(display.width() - 1, 0, 0, i, SH110X_WHITE); display.display(); delay(1); } for (int16_t i = 0; i < display.width(); i += 4) { ccx display.drawLine(display.width() - 1, 0, i, display.height() - 1, SH110X_WHITE); display.display(); delay(1); } delay(250); } |
1.5 דוגמאות
|
1 2 3 4 5 6 7 8 9 10 11 12 13 14 15 16 17 18 19 20 21 22 23 24 25 26 27 28 29 30 31 32 33 34 35 36 37 38 39 40 41 42 43 44 45 46 47 48 49 50 51 52 53 54 55 56 57 58 59 60 61 62 63 64 65 66 67 68 69 70 71 72 73 74 75 76 77 78 79 80 81 82 83 84 85 86 87 88 89 90 91 92 93 94 95 96 97 98 99 100 101 102 103 104 105 106 107 108 109 110 111 112 113 114 115 116 117 118 119 120 121 122 123 124 125 126 127 128 129 130 131 132 133 134 135 136 137 138 139 140 141 142 143 144 145 146 147 148 149 150 151 152 153 154 155 156 157 158 159 160 161 162 163 164 165 166 167 168 169 170 171 172 173 174 175 176 177 178 179 180 181 182 183 184 185 186 187 188 189 190 191 192 193 194 195 196 197 198 199 200 201 202 203 204 205 206 207 208 209 210 211 212 213 214 215 216 217 218 219 220 221 222 223 224 225 226 227 228 229 230 231 232 233 234 235 236 237 238 239 240 241 242 243 244 245 246 247 248 249 250 251 252 253 254 255 256 257 258 259 260 261 262 263 264 265 266 267 268 269 270 271 272 273 274 275 276 277 278 279 280 281 282 283 284 285 286 287 288 289 290 291 292 293 294 295 296 297 298 299 300 301 302 303 304 305 306 307 308 309 310 311 312 313 314 315 316 317 318 319 320 321 322 323 324 325 326 327 328 329 330 331 332 333 334 335 336 337 338 339 340 341 342 343 344 345 346 347 348 349 350 351 352 353 354 355 356 |
/********************************************************************* This is an example for our Monochrome OLEDs based on SH110X drivers This example is for a 128x64 size display using I2C to communicate 3 pins are required to interface (2 I2C and one reset) Adafruit invests time and resources providing this open source code, please support Adafruit and open-source hardware by purchasing products from Adafruit! Written by Limor Fried/Ladyada for Adafruit Industries. BSD license, check license.txt for more information All text above, and the splash screen must be included in any redistribution i2c SH1106 modified by Rupert Hirst 12/09/21 *********************************************************************/ #include <SPI.h> #include <Wire.h> #include <Adafruit_GFX.h> #include <Adafruit_SH110X.h> /* Uncomment the initialize the I2C address , uncomment only one, If you get a totally blank screen try the other*/ #define i2c_Address 0x3c //initialize with the I2C addr 0x3C Typically eBay OLED's //#define i2c_Address 0x3d //initialize with the I2C addr 0x3D Typically Adafruit OLED's #define SCREEN_WIDTH 128 // OLED display width, in pixels #define SCREEN_HEIGHT 64 // OLED display height, in pixels #define OLED_RESET -1 // QT-PY / XIAO Adafruit_SH1106G display = Adafruit_SH1106G(SCREEN_WIDTH, SCREEN_HEIGHT, &Wire, OLED_RESET); #define NUMFLAKES 10 #define XPOS 0 #define YPOS 1 #define DELTAY 2 #define LOGO16_GLCD_HEIGHT 16 #define LOGO16_GLCD_WIDTH 16 static const unsigned char PROGMEM logo16_glcd_bmp[] = { B00000000, B11000000, B00000001, B11000000, B00000001, B11000000, B00000011, B11100000, B11110011, B11100000, B11111110, B11111000, B01111110, B11111111, B00110011, B10011111, B00011111, B11111100, B00001101, B01110000, B00011011, B10100000, B00111111, B11100000, B00111111, B11110000, B01111100, B11110000, B01110000, B01110000, B00000000, B00110000 }; void setup() { Serial.begin(9600); // Show image buffer on the display hardware. // Since the buffer is intialized with an Adafruit splashscreen // internally, this will display the splashscreen. delay(250); // wait for the OLED to power up display.begin(i2c_Address, true); // Address 0x3C default //display.setContrast (0); // dim display display.display(); delay(2000); // Clear the buffer. display.clearDisplay(); // draw a single pixel display.drawPixel(10, 10, SH110X_WHITE); // Show the display buffer on the hardware. // NOTE: You _must_ call display after making any drawing commands // to make them visible on the display hardware! display.display(); delay(2000); display.clearDisplay(); // draw many lines testdrawline(); display.display(); delay(2000); display.clearDisplay(); // draw rectangles testdrawrect(); display.display(); delay(2000); display.clearDisplay(); // draw multiple rectangles testfillrect(); display.display(); delay(2000); display.clearDisplay(); // draw mulitple circles testdrawcircle(); display.display(); delay(2000); display.clearDisplay(); // draw a SH110X_WHITE circle, 10 pixel radius display.fillCircle(display.width() / 2, display.height() / 2, 10, SH110X_WHITE); display.display(); delay(2000); display.clearDisplay(); testdrawroundrect(); delay(2000); display.clearDisplay(); testfillroundrect(); delay(2000); display.clearDisplay(); testdrawtriangle(); delay(2000); display.clearDisplay(); testfilltriangle(); delay(2000); display.clearDisplay(); // draw the first ~12 characters in the font testdrawchar(); display.display(); delay(2000); display.clearDisplay(); // text display tests display.setTextSize(1); display.setTextColor(SH110X_WHITE); display.setCursor(0, 0); display.println("Failure is always an option"); display.setTextColor(SH110X_BLACK, SH110X_WHITE); // 'inverted' text display.println(3.141592); display.setTextSize(2); display.setTextColor(SH110X_WHITE); display.print("0x"); display.println(0xDEADBEEF, HEX); display.display(); delay(2000); display.clearDisplay(); // miniature bitmap display display.drawBitmap(30, 16, logo16_glcd_bmp, 16, 16, 1); display.display(); delay(1); // invert the display display.invertDisplay(true); delay(1000); display.invertDisplay(false); delay(1000); display.clearDisplay(); // draw a bitmap icon and 'animate' movement testdrawbitmap(logo16_glcd_bmp, LOGO16_GLCD_HEIGHT, LOGO16_GLCD_WIDTH); } void loop() { } void testdrawbitmap(const uint8_t *bitmap, uint8_t w, uint8_t h) { uint8_t icons[NUMFLAKES][3]; // initialize for (uint8_t f = 0; f < NUMFLAKES; f++) { icons[f][XPOS] = random(display.width()); icons[f][YPOS] = 0; icons[f][DELTAY] = random(5) + 1; Serial.print("x: "); Serial.print(icons[f][XPOS], DEC); Serial.print(" y: "); Serial.print(icons[f][YPOS], DEC); Serial.print(" dy: "); Serial.println(icons[f][DELTAY], DEC); } while (1) { // draw each icon for (uint8_t f = 0; f < NUMFLAKES; f++) { display.drawBitmap(icons[f][XPOS], icons[f][YPOS], bitmap, w, h, SH110X_WHITE); } display.display(); delay(200); // then erase it + move it for (uint8_t f = 0; f < NUMFLAKES; f++) { display.drawBitmap(icons[f][XPOS], icons[f][YPOS], bitmap, w, h, SH110X_BLACK); // move it icons[f][YPOS] += icons[f][DELTAY]; // if its gone, reinit if (icons[f][YPOS] > display.height()) { icons[f][XPOS] = random(display.width()); icons[f][YPOS] = 0; icons[f][DELTAY] = random(5) + 1; } } } } void testdrawchar(void) { display.setTextSize(1); display.setTextColor(SH110X_WHITE); display.setCursor(0, 0); for (uint8_t i = 0; i < 168; i++) { if (i == '\n') continue; display.write(i); if ((i > 0) && (i % 21 == 0)) display.println(); } display.display(); delay(1); } void testdrawcircle(void) { for (int16_t i = 0; i < display.height(); i += 2) { display.drawCircle(display.width() / 2, display.height() / 2, i, SH110X_WHITE); display.display(); delay(1); } } void testfillrect(void) { uint8_t color = 1; for (int16_t i = 0; i < display.height() / 2; i += 3) { // alternate colors display.fillRect(i, i, display.width() - i * 2, display.height() - i * 2, color % 2); display.display(); delay(1); color++; } } void testdrawtriangle(void) { for (int16_t i = 0; i < min(display.width(), display.height()) / 2; i += 5) { display.drawTriangle(display.width() / 2, display.height() / 2 - i, display.width() / 2 - i, display.height() / 2 + i, display.width() / 2 + i, display.height() / 2 + i, SH110X_WHITE); display.display(); delay(1); } } void testfilltriangle(void) { uint8_t color = SH110X_WHITE; for (int16_t i = min(display.width(), display.height()) / 2; i > 0; i -= 5) { display.fillTriangle(display.width() / 2, display.height() / 2 - i, display.width() / 2 - i, display.height() / 2 + i, display.width() / 2 + i, display.height() / 2 + i, SH110X_WHITE); if (color == SH110X_WHITE) color = SH110X_BLACK; else color = SH110X_WHITE; display.display(); delay(1); } } void testdrawroundrect(void) { for (int16_t i = 0; i < display.height() / 2 - 2; i += 2) { display.drawRoundRect(i, i, display.width() - 2 * i, display.height() - 2 * i, display.height() / 4, SH110X_WHITE); display.display(); delay(1); } } void testfillroundrect(void) { uint8_t color = SH110X_WHITE; for (int16_t i = 0; i < display.height() / 2 - 2; i += 2) { display.fillRoundRect(i, i, display.width() - 2 * i, display.height() - 2 * i, display.height() / 4, color); if (color == SH110X_WHITE) color = SH110X_BLACK; else color = SH110X_WHITE; display.display(); delay(1); } } void testdrawrect(void) { for (int16_t i = 0; i < display.height() / 2; i += 2) { display.drawRect(i, i, display.width() - 2 * i, display.height() - 2 * i, SH110X_WHITE); display.display(); delay(1); } } void testdrawline() { for (int16_t i = 0; i < display.width(); i += 4) { display.drawLine(0, 0, i, display.height() - 1, SH110X_WHITE); display.display(); delay(1); } for (int16_t i = 0; i < display.height(); i += 4) { display.drawLine(0, 0, display.width() - 1, i, SH110X_WHITE); display.display(); delay(1); } delay(250); display.clearDisplay(); for (int16_t i = 0; i < display.width(); i += 4) { display.drawLine(0, display.height() - 1, i, 0, SH110X_WHITE); display.display(); delay(1); } for (int16_t i = display.height() - 1; i >= 0; i -= 4) { display.drawLine(0, display.height() - 1, display.width() - 1, i, SH110X_WHITE); display.display(); delay(1); } delay(250); display.clearDisplay(); for (int16_t i = display.width() - 1; i >= 0; i -= 4) { display.drawLine(display.width() - 1, display.height() - 1, i, 0, SH110X_WHITE); display.display(); delay(1); } for (int16_t i = display.height() - 1; i >= 0; i -= 4) { display.drawLine(display.width() - 1, display.height() - 1, 0, i, SH110X_WHITE); display.display(); delay(1); } delay(250); display.clearDisplay(); for (int16_t i = 0; i < display.height(); i += 4) { display.drawLine(display.width() - 1, 0, 0, i, SH110X_WHITE); display.display(); delay(1); } for (int16_t i = 0; i < display.width(); i += 4) { display.drawLine(display.width() - 1, 0, i, display.height() - 1, SH110X_WHITE); display.display(); delay(1); } delay(250); } |
1.5 דוגמאות
2.הצגה של ראדאר RADAR 1.3 – המשך מערכות תעופתיות
|
1 2 3 4 5 6 7 8 9 10 11 12 13 14 15 16 17 18 19 20 21 22 23 24 25 26 27 28 29 30 31 32 33 34 35 36 37 38 39 40 41 42 43 44 45 46 47 48 49 50 51 52 53 54 55 56 57 58 59 60 61 62 63 64 65 66 67 68 69 70 71 72 73 74 75 76 77 78 79 80 81 82 83 84 85 86 87 88 89 90 91 |
#include <Wire.h> #include <Adafruit_GFX.h> #include <Adafruit_SH110X.h> /* Uncomment the initialize the I2C address , uncomment only one, If you get a totally blank screen try the other*/ #define i2c_Address 0x3c //initialize with the I2C addr 0x3C Typically eBay OLED's //#define i2c_Address 0x3d //initialize with the I2C addr 0x3D Typically Adafruit OLED's #define SCREEN_WIDTH 128 // OLED display width, in pixels #define SCREEN_HEIGHT 64 // OLED display height, in pixels #define OLED_RESET -1 // QT-PY / XIAO Adafruit_SH1106G display = Adafruit_SH1106G(SCREEN_WIDTH, SCREEN_HEIGHT, &Wire, OLED_RESET); #define NUMFLAKES 10 #define XPOS 0 #define YPOS 1 #define DELTAY 2 #define LOGO16_GLCD_HEIGHT 16 #define LOGO16_GLCD_WIDTH 16 static const unsigned char PROGMEM logo16_glcd_bmp[] = { B00000000, B11000000, B00000001, B11000000, B00000001, B11000000, B00000011, B11100000, B11110011, B11100000, B11111110, B11111000, B01111110, B11111111, B00110011, B10011111, B00011111, B11111100, B00001101, B01110000, B00011011, B10100000, B00111111, B11100000, B00111111, B11110000, B01111100, B11110000, B01110000, B01110000, B00000000, B00110000 }; int circleX; int circleY; void setup() { Serial.begin(9600); // Show image buffer on the display hardware. // Since the buffer is intialized with an Adafruit splashscreen // internally, this will display the splashscreen. delay(250); // wait for the OLED to power up display.begin(i2c_Address, true); // Address 0x3C default //display.setContrast (0); // dim display display.display(); delay(2000); // Clear the buffer. display.clearDisplay(); int circleX = random(0, SCREEN_WIDTH); int circleY = random(0, SCREEN_HEIGHT); } #define PI 3.14159265 float move=0; void loop() { // origin of the line, set to center of the screen int x0 = SCREEN_WIDTH / 2; int y0 = SCREEN_HEIGHT / 2; // length of the line int r = min(SCREEN_WIDTH, SCREEN_HEIGHT) - 2; move=move+10; for (int theta = 0; theta < 360; theta++) { // calculate end point int x1 = x0 + r * cos(theta * PI / 180.0); int y1 = y0 + r * sin(theta * PI / 180.0); // draw the line display.clearDisplay(); // clear previous line display.drawLine(x0, y0, x1, y1, SH110X_WHITE); // draw the circle display.drawCircle(circleX + circleX+(int)move, 15, 5, SH110X_WHITE); // circle of 8 pixel diameter means 4 pixel radius move=move+0.1; display.display(); delay(2); // control the speed of the rotation } } |
3. מנוע צעד – תרגיל לימוד עצמי בכיתה (פנה למרצה אם יש קושי)
היכנס לקישור הבא : הפעל את הרכיב
3.1 המנוע הינו 28BYJ-48 Stepper Motor
3.2 ULN2003 motor driver