מבוא לבינה מלאכותית RB40-05 : פיתוח מיקרובקר עם בינה מלאכותית – חלק א
מבוא לבינה מלאכותית RB40-05 : פיתוח מיקרובקר עם בינה מלאכותית
חלק א : פרויקטים ב ESP32 מיקרובקר
חלק ב : מבוא ל מיקרו בקר ESP32 מיקרובקר
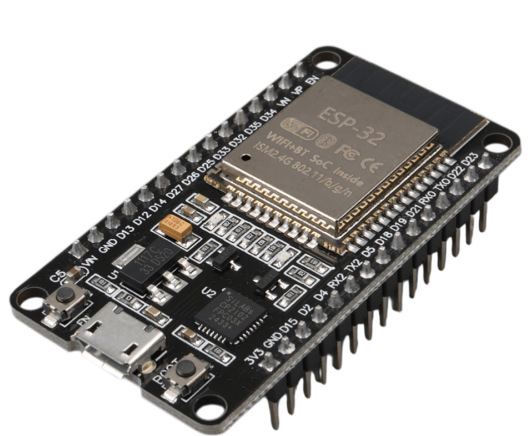
ESP32 DevKit – לוח פיתוח המבוסס על ESP32, המספק יכולת עיבוד גבוהה יותר ותקשורת Wi-Fi ו-Bluetooth.
קישור למיקרו בקר
esp32 תוכניות לדוגמא – לימוד שפת C אמבדד
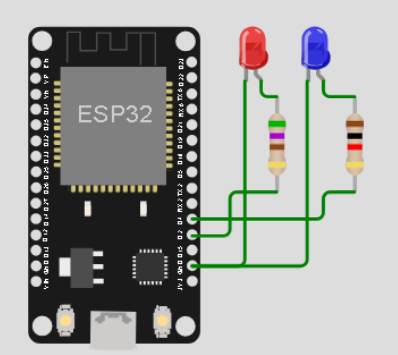
|
// https://robotronix.co.il
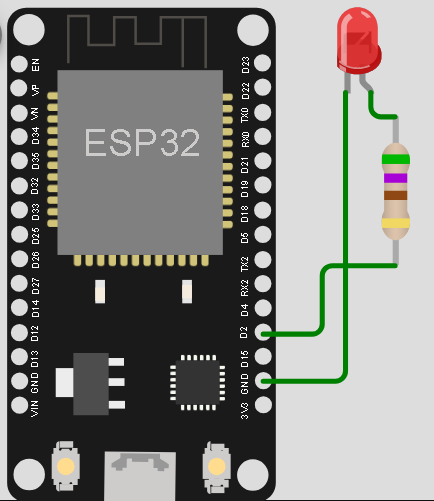
int ledRed = 2; // Set GPIO 2 for the red LED
int ledBlue = 4; // Set GPIO 4 for the blue LED
void setup() { // Runs once when the ESP32 starts
pinMode(ledRed, OUTPUT); // Set red LED pin as output
pinMode(ledBlue, OUTPUT); // Set blue LED pin as output
Serial.begin(115200); // Start serial communication
Serial.println("Hello, ESP32!"); // Print a message
}
void loop() { // Runs repeatedly
digitalWrite(ledRed, HIGH); // Turn ON red LED
digitalWrite(ledBlue, LOW); // Turn OFF blue LED
delay(1000); // Wait 1 second
digitalWrite(ledRed, LOW); // Turn OFF red LED
digitalWrite(ledBlue, HIGH); // Turn ON blue LED
delay(1000); // Wait 1 second
}
|
2. סרבו פשוט – יש להוסיף ספריה
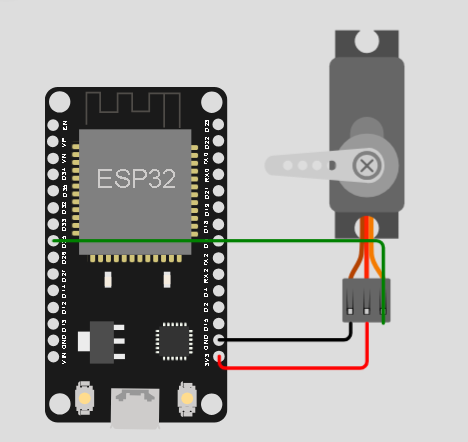
https://wokwi.com/projects/375843908458559489
|
// Servo example for ESP32
// http://www.robotronix.co.il
#include <ESP32Servo.h> // Include servo library
int servoPin = 25; // Servo signal connected to GPIO 25
int pos = 0; // Store servo angle
Servo servo; // Create servo object
void setup() { // Run once at startup
Serial.begin(115200); // Start serial communication
Serial.println("start, robotronix.co.il"); // Print message
servo.attach(servoPin, 500, 2400); // Set GPIO and pulse range (us)
}
void loop() { // Run continuously
for (pos = 0; pos <= 180; pos++) { // Move from 0 to 180 degrees
servo.write(pos); // Set servo position
delay(15); // Wait 15 ms
}
for (pos = 180; pos >= 0; pos—) { // Move from 180 to 0 degrees
servo.write(pos); // Set servo position
delay(15); // Wait 15 ms
}
}
|
3. שימוש כפתור – הדלקה לד
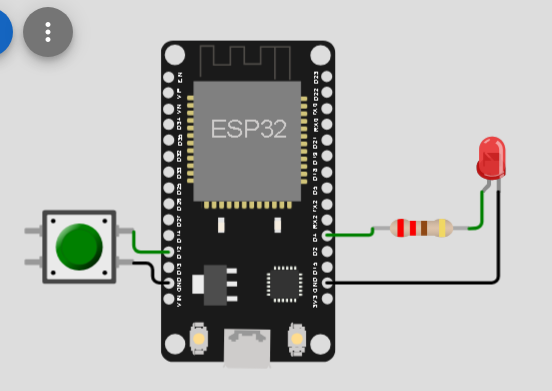
https://wokwi.com/projects/348323129018286675
|
// www.robotronix.co.il
// Embedded Systems Programming Course
// Robotics, Microcontrollers, Arduino and ESP32
#define led 4 // LED connected to GPIO 4
#define button 12 // Button connected to GPIO 12
int buttonState; // Store the button state
void setup() { // Run once at startup
Serial.begin(115200); // Start serial communication
Serial.println("System started"); // Print startup message
pinMode(button, INPUT_PULLUP); // Enable internal pull-up resistor
pinMode(led, OUTPUT); // Set LED pin as output
}
void loop() { // Run continuously
buttonState = digitalRead(button); // Read button state
if (buttonState == LOW) { // Check if button is pressed
Serial.println("LED ON"); // Print LED status
digitalWrite(led, HIGH); // Turn LED ON
}
if (buttonState == HIGH) { // Check if button is released
Serial.println("LED OFF"); // Print LED status
digitalWrite(led, LOW); // Turn LED OFF
}
delay(100); // Wait 100 ms
}
|
4.שימוש בסרבו לד , פוטנציומטר
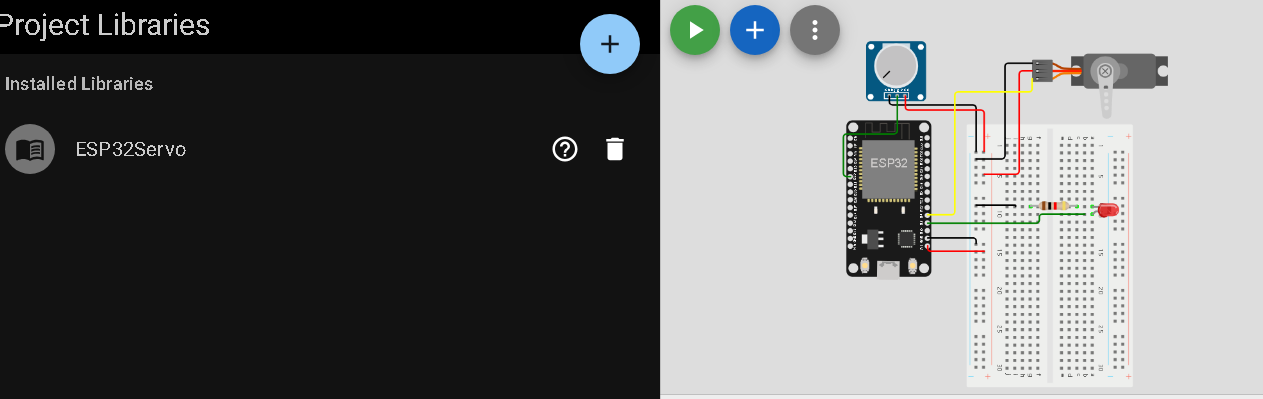
https://wokwi.com/projects/369857352802240513
|
// www.robotronix.co.il
// Embedded Systems and Robotics Programming Course
// ESP32 – Potentiometer, LED and Servo Motor
#include <ESP32Servo.h> // Include ESP32 servo library
const int ledPin = 2; // LED connected to GPIO 2
const int potentiometerPin = 32; // Potentiometer connected to GPIO 32
const int servoPin = 4; // Servo connected to GPIO 4
Servo servo; // Create servo object
void setup() { // Run once at startup
pinMode(ledPin, OUTPUT); // Set LED pin as output
pinMode(potentiometerPin, INPUT); // Set potentiometer pin as input
servo.setPeriodHertz(50); // Set servo PWM frequency to 50 Hz
servo.attach(servoPin); // Attach servo to GPIO 4
Serial.begin(115200); // Start serial communication
}
void loop() { // Run continuously
int potValue = analogRead(potentiometerPin); // Read analog value (0-4095)
Serial.print("Potentiometer Value: "); // Print label
Serial.println(potValue); // Print measured value
if (potValue > 1000) { // Check if value is above threshold
digitalWrite(ledPin, HIGH); // Turn LED ON
servo.write(0); // Move servo to 0 degrees
} else { // Value is 1000 or less
digitalWrite(ledPin, LOW); // Turn LED OFF
servo.write(180); // Move servo to 180 degrees
}
delay(100); // Wait 100 milliseconds
}
|
5. קליטת מספר מהמקלדת והדלקת לד
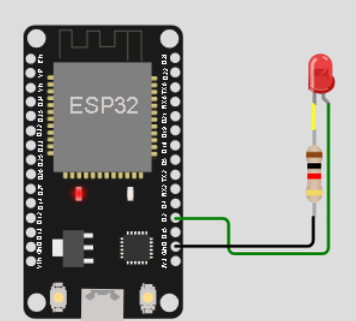
|
const int ledPin = 2; // Pin connected to the LED
bool ledState = false; // Current state of the LED
void setup() {
Serial.begin(9600);
pinMode(ledPin, OUTPUT);
digitalWrite(ledPin, LOW); // Turn off the LED initially
}
void loop() {
if (Serial.available() > 0) {
int command = Serial.parseInt(); // Read the incoming numeric command
// Process the received command using select-case structure
switch (command) {
case 1: // Command 1 to turn the LED on
digitalWrite(ledPin, HIGH); // Turn on the LED
ledState = true;
Serial.println("LED is ON");
break;
case 2: // Command 2 to turn the LED off
digitalWrite(ledPin, LOW); // Turn off the LED
ledState = false;
Serial.println("LED is OFF");
break;
case 3: // Command 3 to get the current LED state
if (ledState) {
Serial.println("LED is currently ON");
} else {
Serial.println("LED is currently OFF");
}
break;
default:
Serial.println("Invalid command. Available commands: 1 (ON), 2 (OFF), 3 (CURRENT)");
break;
}
// Read the remaining characters from the serial buffer to clear it
while (Serial.available() > 0) {
char _ = Serial.read();
}
}
}
|
5.1 שימוש במסך oled 0.96 – כתיבת הודעה פשוטה SSD106
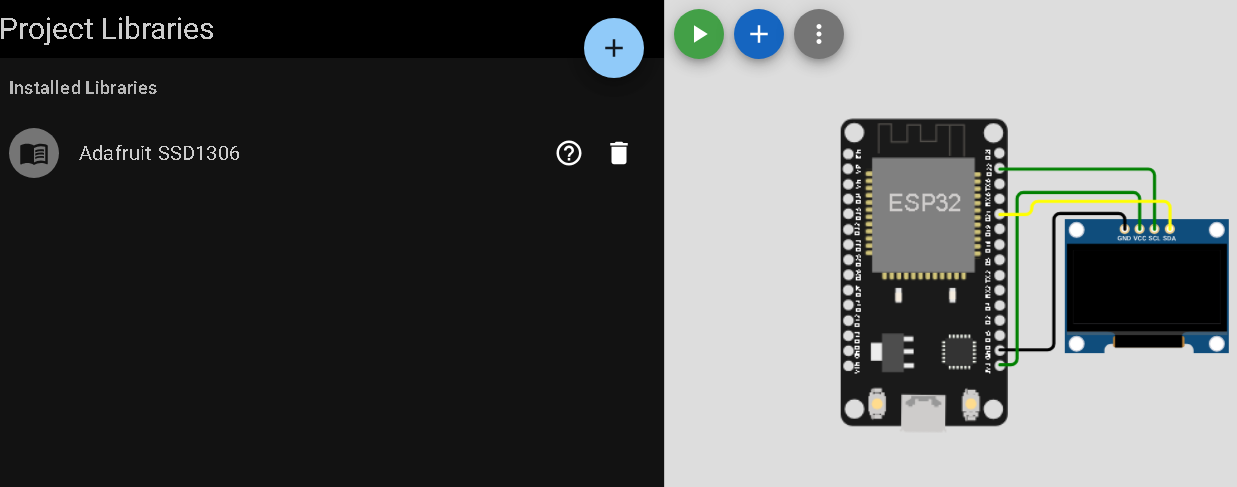
https://wokwi.com/projects/350341364144144978
5.2 גלאי מרחק
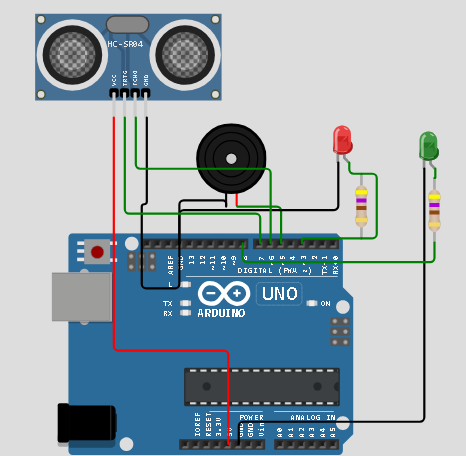
https://wokwi.com/projects/367903941031500801
|
// www.robotronix.co.il
// רובוטרוניקס קורס C510
// שיעור 8 – צללים טונים
#define speaker 5
#define LedRed 3
#define LedGreen 8
const int pingPin = 7; // Trigger Pin of Ultrasonic Sensor
const int echoPin = 6; // Echo Pin of Ultrasonic Sensor
void setup() {
// pin setting
pinMode(pingPin, OUTPUT);
pinMode(echoPin, INPUT);
pinMode(LedRed , OUTPUT);
pinMode(LedGreen, OUTPUT);
digitalWrite(LedRed, HIGH);
digitalWrite(LedGreen , HIGH);
Serial.begin(9600); // Starting Serial Terminal
delay(250);
digitalWrite(LedRed, LOW);
digitalWrite(LedGreen , LOW);
Serial.println("starting …");
}
void loop() {
long duration, inches, cm;
// generate pulse ___|^^^^^|_______________
digitalWrite(pingPin, LOW);
delayMicroseconds(2);
digitalWrite(pingPin, HIGH);
delayMicroseconds(10);
digitalWrite(pingPin, LOW);
// read pulse
duration = pulseIn(echoPin, HIGH);
cm = microsecondsToCentimeters(duration);
// Serial.print(inches);
// Serial.print("in, ");
Serial.print(cm);
Serial.print("cm");
Serial.println();
if(cm > 200) // 20 cm
{
digitalWrite(LedRed, LOW);
digitalWrite(LedGreen, HIGH);
}
else
{
digitalWrite(LedRed ,HIGH);
digitalWrite(LedGreen, LOW);
}
delay(200);
}
long microsecondsToCentimeters(long microseconds) {
return (microseconds / 29 / 2);
}
/*
In the code, the division by 29 is used to convert the duration of the ultrasonic pulse (measured in microseconds) into a distance measurement in centimeters. This conversion is based on the speed of sound in air and the round-trip travel time of the ultrasonic pulse.
The speed of sound in air is approximately 343 meters per second (or 34300 centimeters per second). To calculate the distance traveled by the ultrasonic pulse, you need to consider the time it takes for the pulse to travel from the sensor to the obstacle and back.
Since the pulse needs to travel the distance twice (to the obstacle and back), the time measured by the pulseIn() function represents the round-trip time. To calculate the one-way distance traveled by the pulse, you divide the round-trip time by 2.
However, the pulseIn() function returns the duration in microseconds, so you need to convert it to seconds by dividing it by 1,000,000. Thus, you have the time taken by the pulse for a one-way trip in seconds.
To convert this time to distance in centimeters, you multiply it by the speed of sound (34300 cm/s). The resulting value is the distance traveled by the pulse in centimeters.
Here's the breakdown of the calculation:
duration is the pulse duration measured by pulseIn() in microseconds.
microsecondsToCentimeters(duration) function divides the duration by 29 (approximately the speed of sound divided by 2), giving the one-way distance traveled by the pulse in centimeters.
Keep in mind that this is an approximation as the speed of sound can vary slightly with factors like temperature and humidity.
*/
|
6. מחרוזות STRING : אורך , הוספה , העתקה ,חיפוש
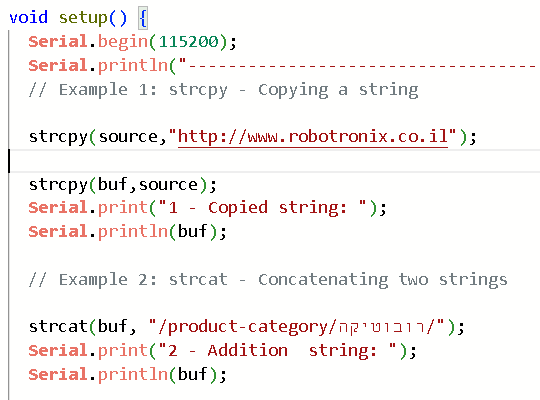
|
// https://www.robotronix.co.il
// String Programming Exercises – Robotics and Microcontrollers
// Learn C Strings, Arduino and ESP32 Programming
#include <string.h> // Include C string functions
char buf[80]; // Buffer for string operations
char source[40]; // Buffer for the source string
void setup() { // Run once at startup
Serial.begin(115200); // Start serial communication
Serial.println("—————————————");
// Example 1: strcpy – Copy a string
strcpy(source, "http://www.robotronix.co.il"); // Store website address
strcpy(buf, source); // Copy source into buf
Serial.print("1 – Copied string: "); // Print label
Serial.println(buf); // Print copied string
// Example 2: strcat – Concatenate two strings
strcat(buf, "/product-category/robotics/"); // Add text to the string
Serial.print("2 – Combined string: "); // Print label
Serial.println(buf); // Print combined string
// Example 3: strlen – Get string length
size_t length = strlen(buf); // Count characters in the string
Serial.print("3 – String length: "); // Print label
Serial.println(length); // Print string length
// Example 4: strstr – Find a substring
if (strstr(buf, ".co.il") != NULL) { // Search for ".co.il"
Serial.println("4 – Substring .co.il found");
} else { // Substring does not exist
Serial.println("4 – Substring not found");
}
// Example 5: strcmp – Compare two strings
const char* key = "12345"; // Define the correct password
char userInputKey[20]; // Store the entered password
strcpy(userInputKey, "24923"); // Set example password
int comparison = strcmp(key, userInputKey); // Compare passwords
if (comparison == 0) { // Strings are identical
Serial.println("5 – Password correct");
} else { // Strings are different
Serial.println("5 – Wrong password");
}
}
void loop() { // Run continuously
// Nothing to execute
}
|
7. מחרוזות
8. מחרוזות אובייקט מחרזות :
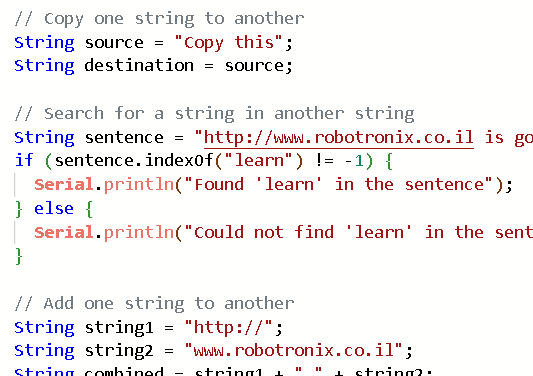
https://wokwi.com/projects/369816336550145025
9.מחרוזות אובייקט STRING פונקציה
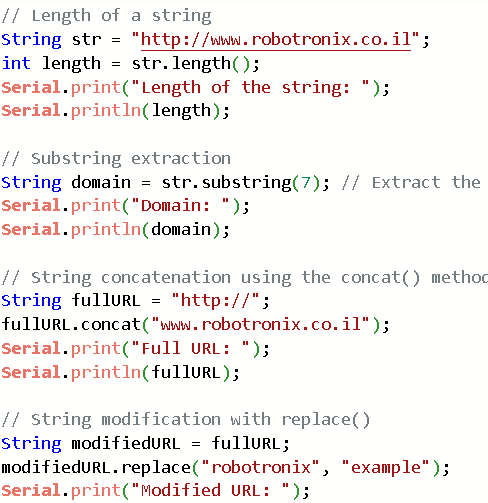
https://wokwi.com/projects/369816474549039105
10.בארז – רמקול
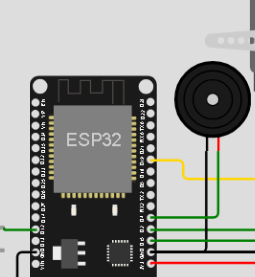
חלק ג רכיבים אלקטרונים
- חיבור כפתור
pull up , pull down ארדואינו , מיקרובקר pull up , pull down – הסוד שצריך ללמוד
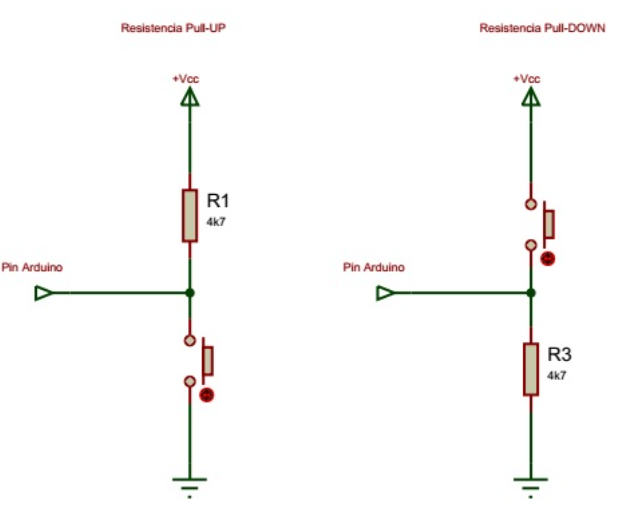
1.3 מיקרו בקר לחיצה על כפתור והעלת רכיב חשמלי – כגון לד
HC-SR04 – Ultrasonic Distance Sensor
הערה : גם יש בארדואינו אונו נגדי פול אפ
https://wokwi.com/projects/348323129018286675
|
// www.robotronix.co.il
// Embedded Systems Programming Course
// Robotics, Microcontrollers, Arduino and ESP32
#define led 4 // LED connected to GPIO 4
#define button 12 // Button connected to GPIO 12
int buttonState; // Store the button state
void setup() { // Run once at startup
Serial.begin(115200); // Start serial communication
Serial.println("System started"); // Print startup message
pinMode(button, INPUT_PULLUP); // Enable internal pull-up resistor
pinMode(led, OUTPUT); // Set LED pin as output
}
void loop() { // Run continuously
buttonState = digitalRead(button); // Read button state
if (buttonState == LOW) { // Check if button is pressed
Serial.println("LED ON"); // Print LED status
digitalWrite(led, HIGH); // Turn LED ON
}
if (buttonState == HIGH) { // Check if button is released
Serial.println("LED OFF"); // Print LED status
digitalWrite(led, LOW); // Turn LED OFF
}
delay(100); // Wait 100 ms
}
|
אולטראסוניק סנסור 40Khz
HC-SR04 – Ultrasonic Distance Sensor

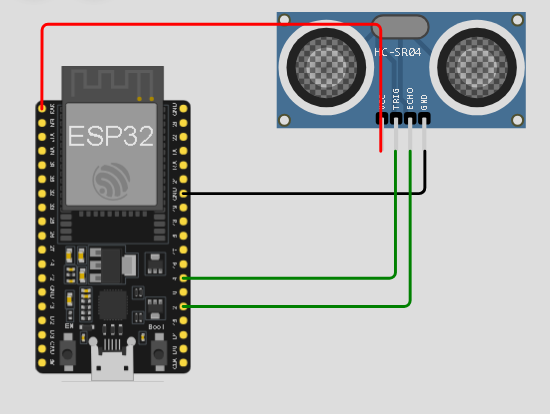
קישור לתוכנה הדגמה
|
/*
www.robotronix.co.il
Course C506 – Learn Arduino
Project: Ultrasonic Distance Sensor HC-SR04
Connections:
TRIG -> Arduino Digital Pin 4
ECHO -> Arduino Digital Pin 2
VCC -> 5V
GND -> GND
*/
// Define ultrasonic sensor pins
const int pingPin = 4; // TRIG pin – sends ultrasonic pulses
const int echoPin = 2; // ECHO pin – receives the reflected signal
// Setup function runs once when Arduino starts
void setup() {
// Initialize serial communication at 9600 baud
Serial.begin(9600);
// Configure TRIG pin as output
pinMode(pingPin, OUTPUT);
// Configure ECHO pin as input
pinMode(echoPin, INPUT);
// Set TRIG pin to LOW initially
digitalWrite(pingPin, LOW);
}
// Main loop runs continuously
void loop() {
// Store echo pulse duration in microseconds
unsigned long duration;
// Variables for distance measurements
long inches;
long cm;
// Step 1: Clear the TRIG pin
digitalWrite(pingPin, LOW);
// Wait for 2 microseconds
delayMicroseconds(2);
// Step 2: Generate the ultrasonic trigger pulse
digitalWrite(pingPin, HIGH);
// Keep TRIG HIGH for 10 microseconds
delayMicroseconds(10);
// Stop the trigger pulse
digitalWrite(pingPin, LOW);
// Step 3: Measure the ECHO pulse duration
// Timeout after 30000 microseconds
duration = pulseIn(echoPin, HIGH, 30000UL);
// Check if a valid echo was received
if (duration == 0) {
// No echo was detected before timeout
Serial.println("No Echo");
} else {
// Step 4: Convert duration to inches
inches = microsecondsToInches(duration);
// Convert duration to centimeters
cm = microsecondsToCentimeters(duration);
// Step 5: Display distance in centimeters
Serial.print("Distance: ");
Serial.print(cm);
Serial.println(" cm");
// Optional: Display distance in inches
// Serial.print(inches);
// Serial.println(" inches");
}
// Wait 250 milliseconds before next measurement
delay(250);
}
// Convert echo duration to distance in inches
long microsecondsToInches(unsigned long microseconds) {
// Sound travels approximately 1 inch in 74 microseconds
// Divide by 2 because sound travels to the object and back
return microseconds / 74 / 2;
}
// Convert echo duration to distance in centimeters
long microsecondsToCentimeters(unsigned long microseconds) {
// Sound travels approximately 1 cm in 29 microseconds
// Divide by 2 because sound travels to the object and back
return microseconds / 29 / 2;
}
|
מסך OLED
מתקדם – חלק ב: הוספת מסך ודרייבר תוכנה EPS32 – OLED למיקרו בקר ESP3
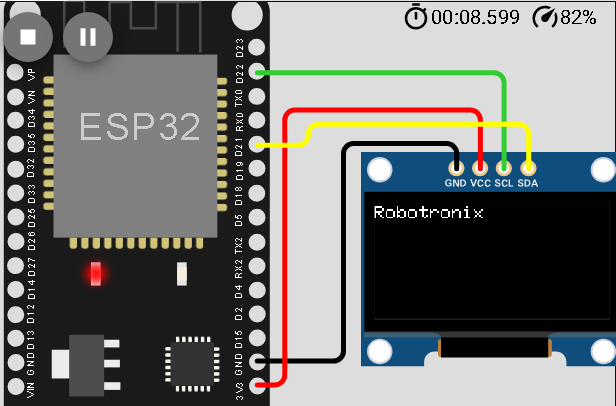
הוספת ספריות OLED לפרויקט ESP32 ב־Wokwi
-
פתח את Wokwi – ESP32 New Project.
-
בעורך הקוד לחץ על הלשונית Library Manager.
-
לחץ על הכפתור הכחול +.
-
חפש
Adafruit SSD1306ולחץ על שם הספרייה להוספה. -
לחץ שוב על + וחפש
Adafruit GFX Library.Wokwi ייצור אוטומטית קובץ
libraries.txtעם רשימת הספריות.Wokwi Docs
https://wokwi.com/projects/350341364144144978
|
#include <Wire.h>
#include <Adafruit_GFX.h>
#include <Adafruit_SSD1306.h>
#define SCREEN_WIDTH 128 // OLED width, in pixels
#define SCREEN_HEIGHT 64 // OLED height, in pixels
// create an OLED display object connected to I2C
Adafruit_SSD1306 oled(SCREEN_WIDTH, SCREEN_HEIGHT, &Wire, –1);
void setup() {
Serial.begin(9600);
// initialize OLED display with I2C address 0x3C
if (!oled.begin(SSD1306_SWITCHCAPVCC, 0x3C)) {
Serial.println(F("failed to start SSD1306 OLED"));
while (1);
}
delay(2000); // wait two seconds for initializing
oled.clearDisplay(); // clear display
oled.setTextSize(1); // set text size
oled.setTextColor(WHITE); // set text color
oled.setCursor(0, 2); // set position to display (x,y)
oled.println("Robotronix"); // set text
oled.display(); // display on OLED
}
void loop() {
}
|
הרץ בעזרת בינה מלאכותית את המערכת הבאה – ESP32-C3 + ILI9341 TFT LCD
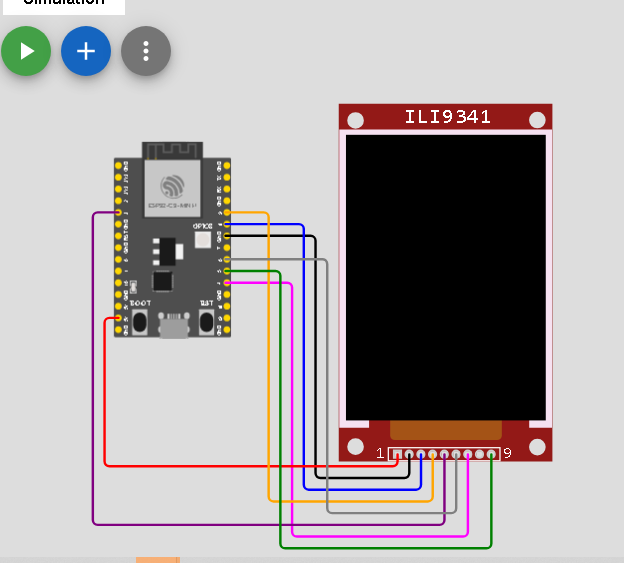 \
About the Author