מבוא בינה מלאכותית RB34-04 : זיהוי פנים של תמונה אדם – יצירת מוסיקה עם A.I
חלק א :
מה חדש – סוכני בינה מלאכותית מתאחדים
חלק א: יצירת שירים ומוסיקה עם בינה מלאכותית – ושילוב סרטון וידאו עם בינה מלאכותית
יחידת החשמונאים :
https://suno.com/s/IHMZAKUEAWd5CTNg
נעשה על ידי בינה מלאכותית A.I זוהר ארגוב ועפרה חזה – גדולי הזמר הישראלי
איך עשו את השיר
Suno היא פלטפורמה מבוססת בינה מלאכותית המאפשרת יצירת מוזיקה באמצעות מחולל טקסט-למוזיקה. הפלטפורמה מאפשרת למשתמשים ליצור שירים מקוריים עם שירה וליריקה על ידי הזנת תיאורים טקסטואליים. מאז השקתה בדצמבר 2023, Suno זמינה באופן נרחב, כולל שיתוף פעולה עם מיקרוסופט לשילוב הפלטפורמה ב-Microsoft Copilot. citeturn0search8
Suno מציעה אפליקציות למכשירי iOS ואנדרואיד, המאפשרות למשתמשים ליצור מוזיקה ישירות מהטלפון הנייד שלהם. citeturn0search3turn0search1 הפלטפורמה משתמשת במודלים מתקדמים ליצירת מוזיקה בהתאם לתיאורים שהוזנו על ידי המשתמש, ומאפשרת התאמה אישית של סגנונות מוזיקליים, כלי נגינה וסוגי קול. citeturn0search5
Suno מציעה תוכניות מנוי שונות, כולל תוכנית חינמית עם 50 קרדיטים יומיים, ותוכניות פרימיום המאפשרות יצירת מוזיקה לשימוש מסחרי. citeturn0search3 הפלטפורמה מתאימה למגוון משתמשים, כולל מוזיקאים מקצועיים, חובבים, יוצרי תוכן ועסקים, ומאפשרת להם ליצור מוזיקה איכותית במהירות ובקלות. citeturn0search5
תרגיל כיתה 1
- היכנס ל chatGPT ובקש לרשום שיר קצר
- כתוב פרמטרים שיופיעו בשיר כמו מקום תיאורים האם השיר צריך להיות מרגש גיל השומע , בקש שזה יהיה עם חרוזים אם חשוב לך – (בדוק שיש חרוזים בשפה העברית אם זה בעברית )
- העתק את טקסט השיר
- פתח את תוכנת הבינה מלאכותית ליצירת שירים https://suno.com/
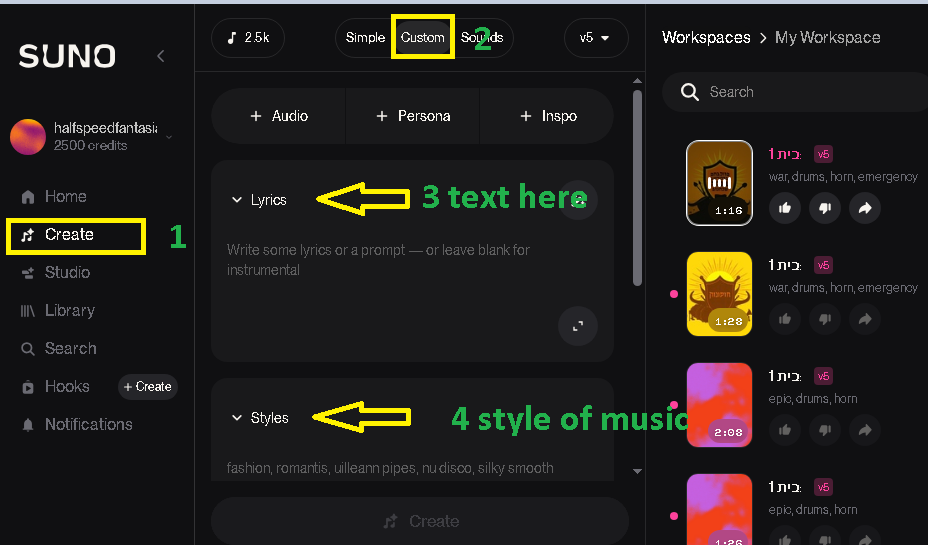
- שים לב שאתה בוחר את מצב custom
מעודכן לפי שלבים
ראש סרטון הדרכה קצר :
חלק ב :
1. תרגיל כיתה : תרגול רשת ANN וסביבת קולאב COLAB
בניית רשת נוירונים בעזרת בינה מלאכותית – קראו את התרגיל עד הסוף
1.1הצגו את גרף הנתונים בעזרת תוכנת פייתון
1.1.2 בנה בעזרת בינה מלאכותית רשת נוירונים בקוד פייתון – בסביבת פיתוח קולאב אשר מקבל את הנתונים הבאים
1.2 הצג את גרף הלמידה הפעל על 40 איפוקס , 100 איפוקס האם הרשת למדה או דרוש יותר אימון ?
הצג גרף של VAL ו COST FUCTION \ ERROR LOST

1.3 נבא את התוצאות : הבאות
0.1 , 1.5 . -2.85 , 2.6
הנתונים של סידרה a ואת הערכים לניסוי
נתונים ערכים לשאלה :
העשרה
1. יצירת מוזיקה (טקסט → מוזיקה)
- MusicGen (Meta) – יצירת מוזיקה מבוססת טקסט.
- Riffusion – יצירת מוזיקה באמצעות Stable Diffusion.
- Magenta (Google) – יצירת מוזיקה מבוססת AI.
2. סינתזה קולית (טקסט → קול/שירה)
- XTTS-v2 (Coqui TTS) – דיבור מציאותי עם רגש.
- Tortoise-TTS – סינתזה קולית מדויקת ואיכותית.
- ElevenLabs – יצירת דיבור ושירה ברמה גבוהה.
- VITS – דיבור ריאליסטי עם התאמה אישית.
3. עיבוד וניתוח אודיו
- Librosa – ניתוח והפקת תכונות קוליות.
- Torchaudio – עיבוד קול בעזרת PyTorch.
- FFmpeg – המרת פורמטים ועריכת אודיו.
4. יצירת כלי נגינה דיגיטליים
- Fluidsynth – יצירת צלילים מסינתיסייזרים.
- MIDIUtil – יצירת קובצי MIDI לכלי נגינה דיגיטליים.
💡 שילוב להפקת שירים: MusicGen + XTTS-v2 + Librosa.
חלק ג : יצירת וידאו מטקסט – שיווק מוצר עם בינה מלאכותית
text to video
יצירת וידאו : מתמונה וטקסט – שיווק מוצר עם בינה מלאכותית


1.תרגיל כיתה
- צור סרטון וידאו לפי רעיון משלך או גיפ נוסע בים או טיגרס הופך לנשר
חלק ד :


|
1 2 3 |
Face Embedding Comparison with InsightFace + Visualization This program compares embeddings (numerical fingerprints) of faces and shows similarity both as numbers and in a side-by-side image view |
|
1 2 3 4 5 6 7 8 9 10 11 12 13 14 15 16 17 18 19 20 21 22 23 24 25 26 27 28 29 30 31 32 33 34 35 36 37 38 39 40 41 42 43 44 45 46 47 48 49 50 51 52 53 54 55 56 57 58 59 60 61 62 63 64 65 66 67 68 69 70 71 72 73 74 75 76 77 78 79 80 81 82 83 |
# -*- coding: utf-8 -*- """ Face Embedding Comparison with InsightFace + Visualization This program compares embeddings (numerical fingerprints) of faces and shows similarity both as numbers and in a side-by-side image view. """ import cv2 import numpy as np from insightface.app import FaceAnalysis # ====================================================== # 1) Load the InsightFace model # ====================================================== app = FaceAnalysis(name="buffalo_l") app.prepare(ctx_id=-1, det_size=(640, 640)) # CPU only # ====================================================== # 2) Load images # ====================================================== img1 = cv2.imread(r"d:\temp\trump1.jpeg") img2 = cv2.imread(r"d:\temp\trump2.jpeg") if img1 is None or img2 is None: raise FileNotFoundError("Could not open one of the images.") # ====================================================== # 3) Detect and encode faces # ====================================================== faces1 = app.get(img1) faces2 = app.get(img2) if len(faces1) == 0 or len(faces2) == 0: raise ValueError("No face detected in one of the images.") emb1 = faces1[0].embedding emb2 = faces2[0].embedding # ====================================================== # 4) Cosine similarity # ====================================================== def cosine_similarity(a, b): return np.dot(a, b) / (np.linalg.norm(a) * np.linalg.norm(b)) similarity = cosine_similarity(emb1, emb2) print(f"Cosine similarity: {similarity:.4f}") # ====================================================== # 5) Make a decision # ====================================================== threshold = 0.35 if similarity > threshold: decision_text = "SAME PERSON" else: decision_text = "DIFFERENT PERSONS" print("Decision:", decision_text) # ====================================================== # 6) Visualization # ====================================================== # Resize both images to same height for side-by-side display h = 300 img1_resized = cv2.resize(img1, (int(img1.shape[1] * h / img1.shape[0]), h)) img2_resized = cv2.resize(img2, (int(img2.shape[1] * h / img2.shape[0]), h)) # Place images next to each other combined = np.hstack((img1_resized, img2_resized)) # Write similarity score and decision on top cv2.putText(combined, f"Similarity: {similarity:.2f}", (10, 30), cv2.FONT_HERSHEY_SIMPLEX, 1.0, (0, 255, 0), 2) cv2.putText(combined, decision_text, (10, 70), cv2.FONT_HERSHEY_SIMPLEX, 1.0, (0, 255, 0) if similarity > threshold else (0, 0, 255), 2) # Save and show result output_path = r"d:\temp\face_compare.jpg" cv2.imwrite(output_path, combined) print(f"Visualization saved at: {output_path}") cv2.imshow("Face Comparison", combined) cv2.waitKey(0) cv2.destroyAllWindows() |
|
1 2 3 4 5 6 7 8 9 10 11 12 13 14 15 16 17 18 19 20 21 22 23 24 25 26 27 28 29 30 31 32 33 34 35 36 37 38 39 40 41 42 43 44 45 46 47 48 49 50 51 52 53 54 55 56 57 58 59 60 61 |
# -*- coding: utf-8 -*- """ Created on Sun Sep 21 03:44:30 2025 @author: dev66 """ import sys print(sys.executable) import cv2 import numpy as np from insightface.app import FaceAnalysis # ====================================================== # 1) Load the InsightFace model # ====================================================== # "buffalo_l" = strong recognition model, works well for face embeddings app = FaceAnalysis(name="buffalo_l") app.prepare(ctx_id=-1, det_size=(640, 640)) # ctx_id=-1 = CPU, 0 = GPU # ====================================================== # 2) Load two face images # ====================================================== img1 = cv2.imread(r"d:\temp\trump1.jpeg") img2 = cv2.imread(r"d:\temp\trump1.jpeg") if img1 is None or img2 is None: raise FileNotFoundError("Could not open one of the images.") # ====================================================== # 3) Detect and encode faces # ====================================================== faces1 = app.get(img1) faces2 = app.get(img2) if len(faces1) == 0 or len(faces2) == 0: raise ValueError("No face detected in one of the images.") embedding1 = faces1[0].embedding embedding2 = faces2[0].embedding print("Embedding shape:", embedding1.shape) # ====================================================== # 4) Cosine similarity function # ====================================================== def cosine_similarity(a, b): return np.dot(a, b) / (np.linalg.norm(a) * np.linalg.norm(b)) similarity = cosine_similarity(embedding1, embedding2) print(f"Cosine similarity: {similarity:.4f}") # ====================================================== # 5) Decision # ====================================================== threshold = 0.35 # typical threshold range: 0.3 - 0.5 if similarity > threshold: print("Result: SAME person") else: print("Result: DIFFERENT persons") |
Face Comparison with InsightFace
:embedding vector
mbedding Vector?
-
An embedding is just a list of numbers.
-
These numbers describe the important features of a face (shape of nose, distance between eyes, jawline, etc.).
-
The list is usually long (for InsightFace, often 512 numbers).
-
Together, those numbers create a unique “fingerprint” of the face.
Why is it useful?
-
The raw image (like 100×100 pixels = 10,000 numbers) is too big to compare directly.
-
The embedding reduces this to 512 numbers that keep only the most important face features.
-
Two embeddings from the same person will look very similar.
-
Two embeddings from different people will look very different.
Simple Example
Think of it like describing a person in short words:
-
Instead of writing a full biography, you say:
-
Height: 1.8
-
Hair: 0.3
-
Skin tone: 0.7
-
Nose: 0.5
-
Smile: 0.9
-
This short list is the embedding vector.
It’s not the full photo, but enough to recognize who it is.
This example shows how to use InsightFace to compare two face images and decide if they belong to the same person. The program uses cosine similarity between face embeddings.
|
1 2 3 4 5 6 7 8 9 10 11 12 |
from insightface.app import FaceAnalysis import cv2 app = FaceAnalysis(name="buffalo_l") app.prepare(ctx_id=-1, det_size=(640, 640)) img = cv2.imread(r"d:\temp\trump1.jpeg") faces = app.get(img) embedding = faces[0].embedding print("Length of embedding vector:", len(embedding)) print("First 10 values:", embedding) |

Explanation
-
512 numbers total → this is the embedding vector.
-
Each number captures some hidden feature of the face.
-
The exact meaning of each number is not human-readable (like “eye width” or “nose length”), but together they form the face fingerprint.
When comparing two faces, InsightFace checks how close these 512-number fingerprints are, usually using cosine similarity.
Step 1 – Imports and setup
import cv2
import numpy as np
from insightface.app import FaceAnalysis
-
sys.executableprints the Python path in use. -
cv2is OpenCV for handling images. -
numpyis used for math. -
FaceAnalysisis the InsightFace tool for detection and embeddings.
Step 2 – Load the InsightFace model
-
buffalo_lis a strong pre-trained face recognition model. -
ctx_id=-1forces CPU usage. -
det_size=(640,640)sets the detection image size.
Step 3 – Load two images
if img1 is None or img2 is None:
raise FileNotFoundError("Could not open one of the images.")
-
Loads the two face images from disk.
-
Raises an error if any image cannot be read.
Step 4 – Detect and encode faces
if len(faces1) == 0 or len(faces2) == 0:
raise ValueError("No face detected in one of the images.")
embedding1 = faces1[0].embedding
embedding2 = faces2[0].embedding
print("Embedding shape:", embedding1.shape)
-
Detects faces in both images.
-
Each face object contains bounding box, landmarks, and a 512-dimensional embedding.
-
Here we take the first detected face.
Step 5 – Cosine similarity function
similarity = cosine_similarity(embedding1, embedding2)
print(f"Cosine similarity: {similarity:.4f}")
-
Cosine similarity measures the angle between two vectors.
-
Value close to 1.0 means the faces are very similar.
-
Value near 0.0 means no relation.
Step 6 – Decision
-
If similarity is above the threshold, the images are considered the same person.
-
Threshold can be tuned (typical range: 0.3–0.5).
How it works
-
InsightFace detects and aligns the face.
-
It encodes the face into a vector of 512 numbers (the embedding).
-
Cosine similarity compares how close two vectors are.
-
If the vectors are close enough, the faces are the same person.
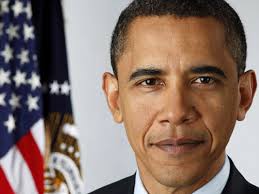
compares Trump1, Trump2, and Obama embeddings, and rewrite it with step-by-step remarks so even someone new can follow
|
1 2 3 4 5 6 7 8 9 10 11 12 13 14 15 16 17 18 19 20 21 22 23 24 25 26 27 28 29 30 31 32 33 34 35 36 37 38 39 40 41 42 43 44 45 46 47 48 49 50 51 52 53 54 55 56 57 58 59 60 61 62 63 64 65 66 67 68 69 70 71 72 73 74 75 76 77 78 79 80 81 82 83 84 85 86 87 88 89 90 91 |
# -*- coding: utf-8 -*- """ Face Embedding Comparison with InsightFace This program compares embeddings (numerical fingerprints) of faces and shows how similar or different they are. """ import cv2 import numpy as np from insightface.app import FaceAnalysis # ====================================================== # 1) Load the InsightFace model # ====================================================== # "buffalo_l" = a strong pre-trained model for face recognition. # ctx_id=-1 means we use CPU. If you have a GPU, use ctx_id=0. # det_size is the input resolution for detection (640x640 is good default). app = FaceAnalysis(name="buffalo_l") app.prepare(ctx_id=-1, det_size=(640, 640)) # ====================================================== # 2) Load three images # ====================================================== # Trump1 and Trump2 should be two different images of the same person. # Obama1 should be an image of another person for comparison. img1 = cv2.imread(r"d:\temp\trump1.jpeg") img2 = cv2.imread(r"d:\temp\trump2.jpeg") img3 = cv2.imread(r"d:\temp\obama1.jpeg") if img1 is None or img2 is None or img3 is None: raise FileNotFoundError("Could not open one of the images. Check paths!") # ====================================================== # 3) Detect faces and compute embeddings # ====================================================== # app.get(image) finds faces and returns information (bounding box, embedding, etc.) faces1 = app.get(img1) faces2 = app.get(img2) faces3 = app.get(img3) # Check that a face was actually found if len(faces1) == 0 or len(faces2) == 0 or len(faces3) == 0: raise ValueError("No face detected in one of the images.") # Each face object has an "embedding" = a 512-number vector (the face fingerprint). emb1 = faces1[0].embedding emb2 = faces2[0].embedding emb3 = faces3[0].embedding # ====================================================== # 4) Print part of the embeddings # ====================================================== # We print only the first 10 numbers for readability. print("Trump1 embedding (first 10 numbers):", emb1[:10]) print("Trump2 embedding (first 10 numbers):", emb2[:10]) print("Obama embedding (first 10 numbers):", emb3[:10]) # ====================================================== # 5) Define cosine similarity # ====================================================== # Cosine similarity checks the angle between two vectors. # If they point in the same direction → similarity ~ 1.0 → same person. # If they point in different directions → similarity ~ 0.0 → different people. def cosine_similarity(a, b): return np.dot(a, b) / (np.linalg.norm(a) * np.linalg.norm(b)) # ====================================================== # 6) Compare embeddings # ====================================================== sim_12 = cosine_similarity(emb1, emb2) # Trump1 vs Trump2 sim_13 = cosine_similarity(emb1, emb3) # Trump1 vs Obama print("\nCosine similarity Trump1 vs Trump2:", sim_12) print("Cosine similarity Trump1 vs Obama :", sim_13) # ====================================================== # 7) Make a decision # ====================================================== # Typical threshold is between 0.3 - 0.5 # (depends on dataset and how strict you want matching to be). threshold = 0.35 if sim_12 > threshold: print("Trump1 vs Trump2: SAME person") else: print("Trump1 vs Trump2: DIFFERENT persons") if sim_13 > threshold: print("Trump1 vs Obama: SAME person") else: print("Trump1 vs Obama: DIFFERENT persons") |