קורס אמבדד – RB19-10 מבוא למיקרובקרים – ונושאים מתקדמים – פרוייקט גמר
1. המשך עבודה עם WIFI – שרת WEB
82.81.11.141 כתובת שרת ניסוי
http://82.81.11.141/list10.php?user=1010

הכנת נתונים :
http://82.81.11.141/a1.php?user=1010&code=60&value=75
![]()
2. מנוע DC
דרייבר L298N 
מנוע מסוג TT MOTOR 
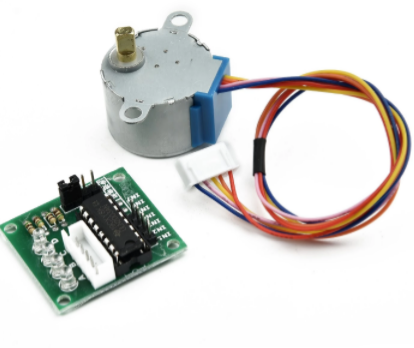
3. מנוע צעד 28BYJ-48 – STEP MOTOR
דרייבר : uln200
|
1 2 3 4 5 6 7 8 9 10 11 12 13 14 15 16 17 18 19 20 21 22 23 24 25 26 27 28 |
#include <Stepper.h> // Define the number of steps per revolution const int stepsPerRevolution = 2048; // Change this according to your stepper motor // Define the pins connected to the motor driver #define IN1 14 #define IN2 12 #define IN3 13 #define IN4 15 // Initialize the stepper motor with the defined pins Stepper myStepper(stepsPerRevolution, IN1, IN2, IN3, IN4); void setup() { // Set the speed of the motor (in RPM) myStepper.setSpeed(30); } void loop() { // Step the motor one step clockwise myStepper.step(stepsPerRevolution); delay(500); // Step the motor one step counterclockwise myStepper.step(-stepsPerRevolution); delay(500); } |
3.1 חיבור מנוע צעד דרך WIFI
To reboot an ESP32, you can use the esp_restart() function provided by the ESP-IDF (Espressif IoT Development Framework). This function restarts the ESP32 microcontroller and runs the program again from the beginning.
Here's an example of how to perform a reboot in C++ using the ESP-IDF:
esp32 reboot
|
1 2 3 4 5 6 7 8 9 10 11 12 |
#include <esp_system.h> void setup() { // Your setup code here } void loop() { // Your loop code here // If you want to reboot the ESP32, call the following function esp_restart(); } |
|
1 2 3 4 5 6 7 8 9 10 11 12 13 14 15 16 17 18 19 20 21 22 23 |
#include "esp_task_wdt.h" void setup() { Serial.begin(115200); delay(10000); // Delay for 10 seconds after the program starts Serial.println("Program started"); // Initialize the hardware watchdog with a timeout value of 5 seconds esp_task_wdt_init(5, true); } void loop() { // Perform some tasks here // ... delay(4000) esp_task_wdt_reset(); // This will trigger the watchdog reset } // Add a delay of 1 second to simulate other operations in the loop delay(6000); delay(6000); } |
Fast Fourier Transform -FFT
FFT stands for "Fast Fourier Transform." It is a widely used mathematical algorithm for efficiently computing the Discrete Fourier Transform (DFT) and its inverse. The FFT is a fundamental tool in signal processing, digital filtering, data analysis, and many other fields.
In simpler terms, the FFT is a method used to transform a time-domain signal into its frequency-domain representation. It allows us to analyze the different frequency components present in a given signal. By performing the FFT on a time-domain signal, we can obtain information about the various frequencies and their respective magnitudes that compose the signal.


esp32 QUICKFFT
ויברציות של מטוס \ כלי תעופה או מתקן על אדמה רכב
Arduino FFT library demo, using INMP441 Microphone and OLED display. DevkitC or other ESP32 board. Credits for original code: Radio Pliers http://radiopench.blog96.fc2.com/ My code at https://github.com/slgrobotics/Misc/
https://github.com/slgrobotics/Misc/tree/master/Arduino/Sketchbook/ESP32_AudioFFTMono