קורס אמבדד – RB19-06 מבוא למיקרובקרים – מבוא לתקשורת נתונים 2
התקנה של ארדואינו ו ESP32
CHAT GPT ESP32
1.תרגיל כיתה – עבודה עם הערכה – קלט
שים לב : חיבור לא נכון ישרוף את המעגל

1.1 התקן סביבת עבודה
1.1.1 חבר את הערכה לפי סכמת החיבור הבאה לד מחובר לפין 2 והפעל את התוכנה מהערכה – (חובה נגד תפקידו להגבלת זרם לדיודה – ללא נגד הלד ישרף ! ויהרוס את המיקרומעבד )

|
1 2 3 4 5 6 7 8 9 10 11 12 |
const int ledPin = 2; void setup() { pinMode(ledPin, OUTPUT); } void loop() { digitalWrite(ledPin, HIGH); // Turn on the LED delay(500); // Wait for 500 ms digitalWrite(ledPin, LOW); // Turn off the LED delay(500); // Wait for another 500 ms } |
1.2 .תרגיל כיתה – עבודה עם הערכה – קלט + פלט
שים לב : חיבור לא נכון ישרוף את המעגל
1.2.1 הוסף פוטנציומטר כאשר ערך הפוטנציומטר גדול מ 1000 הדלק לד כאשר קטן שווה ל1000 כבה לד
https://wokwi.com/projects/369856401733268481


|
1 2 3 4 5 6 7 8 9 10 11 12 13 14 15 16 17 18 19 20 21 22 23 |
const int ledPin = 2; const int potentiometerPin = 32; void setup() { pinMode(ledPin, OUTPUT); pinMode(potentiometerPin, INPUT); Serial.begin(115200); } void loop() { int potValue = analogRead(potentiometerPin); Serial.print("Potentiometer Value: "); Serial.println(potValue); if (potValue > 1000) { digitalWrite(ledPin, HIGH); // Turn on the LED } else { digitalWrite(ledPin, LOW); // Turn off the LED } delay(100); // Delay for stability } |
1.3 הוספת סרבו והתקנת ספרייה לארדואינו
הסרבו והלד מיצגים פתיחה וסגירה של שער
שים לב : חיבור לא נכון ישרוף את המעגל
1.3.1 הוסף סרבו למעגל
1.3.2 הוסף את הספריה לתוכנה בבסביבת ארדואינו
בתוכנת הארדואינו : בחר מנהל הסיפריות

הקלד בתוך :

|
1 |
<span class="hljs-meta">#<span class="hljs-keyword">include</span> <span class="hljs-string">"ESP32Servo.h"</span></span> |
1.3.3 התאם את התכונה לסכמת המעגל – שים לב חיבור הפינים בסרבו עשוי להיות שונה
שער פתוח

שער סגור :

|
1 2 3 4 5 6 7 8 9 10 11 12 13 14 15 16 17 18 19 20 21 22 23 24 25 26 27 28 29 30 31 32 33 |
#include "ESP32Servo.h" const int ledPin = 2; const int potentiometerPin = 32; const int servoPin = 4; Servo servo; void setup() { pinMode(ledPin, OUTPUT); pinMode(potentiometerPin, INPUT); servo.setPeriodHertz(50); servo.attach(servoPin); Serial.begin(115200); } void loop() { int potValue = analogRead(potentiometerPin); Serial.print("Potentiometer Value: "); Serial.println(potValue); if (potValue > 1000) { digitalWrite(ledPin, HIGH); // Turn on the LED servo.write(0); // Set servo position to 0 degrees } else { digitalWrite(ledPin, LOW); // Turn off the LED servo.write(180); // Set servo position to 180 degrees } delay(100); // Delay for stability } |
- חזרה מחרוזות – , strcpy, strcat ,strlen ,strcmp ,strstr
https://wokwi.com/projects/369585490567753729
|
1 2 3 4 5 6 7 8 9 10 11 12 13 14 15 16 17 18 19 20 21 22 23 24 25 26 27 28 29 30 31 32 33 34 35 36 37 38 39 40 41 42 43 44 45 46 47 48 49 50 51 52 53 54 55 |
// https://www.robotronix.co.il // תרגול מחרוזות לימוד תכנות ורובוטיקה char buf[80]; char source[40]; void setup() { Serial.begin(115200); Serial.println("---------------------------------------"); // Example 1: strcpy - Copying a string strcpy(source,"http://www.robotronix.co.il"); strcpy(buf,source); Serial.print("1 - Copied string: "); Serial.println(buf); // Example 2: strcat - Concatenating two strings strcat(buf, "/product-category/רובוטיקה/"); Serial.print("2 - Addition string: "); Serial.println(buf); // Example 3: strlen - Getting the length of a string size_t length = strlen(buf); Serial.print("3- Length of the string: "); Serial.println(length); // Example 4: strstr - Finding a substring if ( strstr(buf, ".co.il") >0 ) { Serial.println("Substring .co.il found "); } else { Serial.println("Substring not found."); } // Example 5: strcmp - Comparing two strings const char* key = "12345"; char userInputKey[20]; strcpy(userInputKey,"24923"); int comparison = strcmp(key, userInputKey); if (comparison ==0) { Serial.println("key o.k"); } else { Serial.println("worng passord "); } } void loop() { // Do nothing } |
1.1 שימוש ב STRING 3
https://wokwi.com/projects/369816336550145025
|
1 2 3 4 5 6 7 8 9 10 11 12 13 14 15 16 17 18 19 20 21 22 23 24 25 26 27 28 29 30 31 32 33 34 35 36 37 38 39 40 41 42 43 44 45 46 47 48 49 50 51 52 53 |
// http://www.robotronix.co.il לימוד ארדואינו מחרוזות void setup() { Serial.begin(115200); // Convert char array to String char buf[100]; strcpy(buf,"Hello, Robotronix.co.il"); //convert from buf array to string String str = String(buf); // Convert String to char array char buf2[100]; str.toCharArray(buf2, sizeof(buf2)); // Compare two strings String str1 = "12232"; String str2 = "12334"; int result = str1.compareTo(str2); if (result == 0) { Serial.println("Strings are equal"); } else if (result < 0) { Serial.println("String 1 is smaller"); } else { Serial.println("String 2 is smaller"); } // Copy one string to another String source = "Copy this"; String destination = source; // Search for a string in another string String sentence = "http://www.robotronix.co.il is good place to learn robotics"; if (sentence.indexOf("learn") != -1) { Serial.println("Found 'learn' in the sentence"); } else { Serial.println("Could not find 'learn' in the sentence"); } // Add one string to another String string1 = "http://"; String string2 = "www.robotronix.co.il"; String combined = string1 + " " + string2; Serial.println(combined); combined.toCharArray(buf2, sizeof(buf2)); } void loop() { // Empty loop } |
1.2 שימוש ב מחזרוזת 4
https://wokwi.com/projects/369816474549039105
|
1 2 3 4 5 6 7 8 9 10 11 12 13 14 15 16 17 18 19 20 21 22 23 24 25 26 27 28 29 30 31 32 33 34 35 36 37 38 |
void setup() { Serial.begin(115200); // Length of a string String str = "http://www.robotronix.co.il"; int length = str.length(); Serial.print("Length of the string: "); Serial.println(length); // Substring extraction String domain = str.substring(7); // Extract the domain name Serial.print("Domain: "); Serial.println(domain); // String concatenation using the concat() method String fullURL = "http://"; fullURL.concat("www.robotronix.co.il"); Serial.print("Full URL: "); Serial.println(fullURL); // String modification with replace() String modifiedURL = fullURL; modifiedURL.replace("robotronix", "example"); Serial.print("Modified URL: "); Serial.println(modifiedURL); // String comparison with equals() String checkURL = "http://www.robotronix.co.il"; if (str.equals(checkURL)) { Serial.println("Strings are equal"); } else { Serial.println("Strings are not equal"); } } void loop() { // Empty loop } |
2. בלוטוס קלאסיק – Bluetooth classic
התקנת טרמינל בלוטוס :Bluetooth classic
2.קוד בלוטוס – פשוט (ללא EVENTS)
כאשר נלחץ על 1 ידליק IO מספר 2 , כאשר נלחץ על 0 יכבה IO מספר 2
|
1 2 3 4 5 6 7 8 9 10 11 12 13 14 15 16 17 18 19 20 21 22 23 24 25 26 27 28 29 30 31 32 33 34 35 36 37 38 39 |
#include <BluetoothSerial.h> BluetoothSerial SerialBT; // Create an instance of the BluetoothSerial library const int LED_PIN = 2; // GPIO pin number for the onboard LED void setup() { Serial.begin(115200); SerialBT.begin("BT_Control v1"); // Set the Bluetooth name as "BT_Control v1" pinMode(LED_PIN, OUTPUT); // Set LED_PIN as an output digitalWrite(LED_PIN, LOW); // Initially turn off the LED } void loop() { if (SerialBT.available()) { char c = SerialBT.read(); // Read incoming data into the buffer if (c == '1') { Serial.println("led 1 on"); // write to pc termial digitalWrite(LED_PIN, HIGH); // Turn on the LED SerialBT.println("led 1 on"); // write to Bluetooth } if (c== '0' ) { Serial.println("led 1 off"); // write to pc termial digitalWrite(LED_PIN, LOW); // Turn off the LED SerialBT.println("led 1 off"); // write to Bluetooth } } } |
2.1. קוד בלוטוס EVENTS
|
1 2 3 4 5 6 7 8 9 10 11 12 13 14 15 16 17 18 19 20 21 22 23 24 25 26 27 28 29 30 31 32 33 34 35 36 37 38 39 40 41 42 43 44 45 46 47 48 49 50 51 52 53 |
#include "BluetoothSerial.h" #define LED_PIN 2 bool isConnected = false; // Variable to track the connection status BluetoothSerial SerialBT; void callback(esp_spp_cb_event_t event, esp_spp_cb_param_t *param){ if(event == ESP_SPP_SRV_OPEN_EVT){ isConnected = true; Serial.println("Client Connected"); } if (event == ESP_SPP_CLOSE_EVT) { isConnected = false; Serial.println("Bluetooth device disconnected"); // Add any code here that should be executed when a device disconnects via Bluetooth } } void setup() { Serial.begin(115200); SerialBT.register_callback(callback); if(!SerialBT.begin("ESP32")){ Serial.println("An error occurred initializing Bluetooth"); }else{ Serial.println("Bluetooth initialized"); } } void loop() { if (SerialBT.available()) { char c = SerialBT.read(); // Read incoming data into the buffer if (c == '1') { Serial.println("led 1 on"); // write to pc termial digitalWrite(LED_PIN, HIGH); // Turn on the LED SerialBT.println("led 1 on"); // write to Bluetooth } if (c== '0' ) { Serial.println("led 1 off"); // write to pc termial digitalWrite(LED_PIN, LOW); // Turn off the LED SerialBT.println("led 1 off"); // write to Bluetooth } } } |
2.2. קוד בלוטוס EVENTS + string
|
1 2 3 4 5 6 7 8 9 10 11 12 13 14 15 16 17 18 19 20 21 22 23 24 25 26 27 28 29 30 31 32 33 34 35 36 37 38 39 40 41 42 43 44 45 46 47 48 49 |
#include <BluetoothSerial.h> #define LED_PIN 2 bool isConnected = false; // Variable to track the connection status BluetoothSerial SerialBT; void callback(esp_spp_cb_event_t event, esp_spp_cb_param_t *param) { if (event == ESP_SPP_SRV_OPEN_EVT) { isConnected = true; Serial.println("Client Connected"); } else if (event == ESP_SPP_CLOSE_EVT) { isConnected = false; Serial.println("Bluetooth device disconnected"); // Add any code here that should be executed when a device disconnects via Bluetooth } } void setup() { Serial.begin(115200); SerialBT.register_callback(callback); if (!SerialBT.begin("ESP32")) { Serial.println("An error occurred initializing Bluetooth"); } else { Serial.println("Bluetooth initialized"); } pinMode(LED_PIN, OUTPUT); // Set LED_PIN as an output digitalWrite(LED_PIN, LOW); // Initially turn off the LED } void loop() { if (SerialBT.available()) { String command = SerialBT.readString(); command.trim(); // Remove leading/trailing whitespaces if (command == "led1") { Serial.println("led 1 on"); // write to pc terminal digitalWrite(LED_PIN, HIGH); // Turn on the LED SerialBT.println("led 1 on"); // write to Bluetooth } else if (command == "led0") { Serial.println("led 1 off"); // write to pc terminal digitalWrite(LED_PIN, LOW); // Turn off the LED SerialBT.println("led 1 off"); // write to Bluetooth } } } |
3. שרת WEB ומבנה "קבצי אינטרנט"
3.1 קובץ PHP פלט בפורמט XML
http://82.81.11.141/test-xml.php?user=1000&p=10
|
1 2 3 4 5 6 7 8 9 10 11 12 13 14 15 16 17 18 19 20 21 22 |
<?php // Get the values of user and p from the GET parameters $user = $_GET['user']; $p = $_GET['p']; // Get the current date and time $currentDateTime = date('Y-m-d H:i:s'); // Prepare the XML response $response = '<?xml version="1.0" encoding="UTF-8"?>'; $response .= '<response>'; $response .= '<datetime>' . $currentDateTime . '</datetime>'; $response .= '<user>' . $user . '</user>'; $response .= '<p>' . $p . '</p>'; $response .= '</response>'; // Set the Content-Type header to specify XML response header('Content-Type: application/xml'); // Send the XML response echo $response; ?> |
3.2.קובץ XML פלט
|
1 2 3 4 5 |
<response> <datetime>2023-07-10 09:44:13</datetime> <user>1000</user> <p>10</p> </response> |
3.3 קובץ JSON
http://82.81.11.141/test-json.php?user=1000&p=10
|
1 2 3 4 5 6 7 8 9 10 11 12 13 14 15 16 17 18 19 20 21 22 23 24 |
<?php // Get the values of user and p from the GET parameters $user = $_GET['user']; $p = $_GET['p']; // Get the current date and time $currentDateTime = date('Y-m-d H:i:s'); // Prepare the response as an array $response = array( 'datetime' => $currentDateTime, 'user' => $user, 'p' => $p ); // Convert the response array to JSON $jsonResponse = json_encode($response); // Set the Content-Type header to specify JSON response header('Content-Type: application/json'); // Send the JSON response echo $jsonResponse; ?> |
פלט
|
1 |
{"datetime":"2023-07-10 10:08:41","user":"1000","p":"10"} |
4. תקשורת WIFI
בשיעור הקודם על ROUTER, FIX IP , DYNAMIC IP dhcp mac
עכשיו ניראה איך מפתחים תוכנה שיודעת לדבר עם שרת WEB לשלוח ולקבל נתונים
בפרומטים שונים
יש לעדכן עבור ה IP : 82.81.11.141
4.1 WIFI עבור test-xml.php?user=1000&p=10
|
1 2 3 4 5 6 7 8 9 10 11 12 13 14 15 16 17 18 19 20 21 22 23 24 25 26 27 28 29 30 31 32 33 34 35 36 37 38 39 40 41 42 43 44 45 46 47 48 49 50 51 52 53 54 55 56 57 58 59 60 61 62 |
#include <WiFi.h> #include <HTTPClient.h> const char* ssid = "ydarewniv"; const char* password = "32ff43fgdffsd1"; const String ip = "82.81.11.141/"; void setup() { Serial.begin(115200); // Connect to Wi-Fi WiFi.begin(ssid, password); while (WiFi.status() != WL_CONNECTED) { delay(1000); Serial.println("Connecting to WiFi..."); } Serial.print("IP address: "); Serial.println(WiFi.localIP()); Serial.println("Connected to WiFi"); } void loop() { if (WiFi.status() == WL_CONNECTED) { HTTPClient http; // Specify the URL to request String url = "http://" + ip + "/test-xml.php?user=1000&p=10"; // Send GET request int httpCode = http.begin(url); if (httpCode > 0) { int httpResponseCode = http.GET(); if (httpResponseCode == HTTP_CODE_OK) { // Get the response payload String payload = http.getString(); Serial.println("Response:"); Serial.println(payload); } else if (httpResponseCode == HTTP_CODE_NOT_FOUND) { Serial.println("HTTP request failed: Resource not found (404)"); } else if (httpResponseCode == HTTP_CODE_UNAUTHORIZED) { Serial.println("HTTP request failed: Unauthorized (401)"); } else if (httpResponseCode == HTTP_CODE_FORBIDDEN) { Serial.println("HTTP request failed: Forbidden (403)"); } else if (httpResponseCode == HTTP_CODE_INTERNAL_SERVER_ERROR) { Serial.println("HTTP request failed: Internal server error (500)"); } else { Serial.printf("HTTP request failed with error code: %d\n", httpResponseCode); } } else { Serial.println("HTTP request failed"); } // End the request http.end(); } // Wait for some time before making the next request delay(5000); } |

4.2 הדלקה וכיבוי של לד לפי ערך שניה אם זוגית או לא זוגית
נשתמש בספריה ל PARSING של XML –
|
1 |
<span class="hljs-meta">#<span class="hljs-keyword">include</span> <span class="hljs-string"><ArduinoXml.h></span></span> |
שנה את ה IP ל IP הנכון
|
1 2 3 4 5 6 7 8 9 10 11 12 13 14 15 16 17 18 19 20 21 22 23 24 25 26 27 28 29 30 31 32 33 34 35 36 37 38 39 40 41 42 43 44 45 46 47 48 49 50 51 52 53 54 55 56 57 58 59 60 61 62 63 64 65 66 67 68 69 70 71 72 73 74 75 76 77 78 79 80 81 82 |
#include <WiFi.h> #include <HTTPClient.h> #include <ArduinoXml.h> const char* ssid = "yaniv"; const char* password = "magic111"; const String ip = "10.0.0.8"; const int ledPin = 13; void setup() { Serial.begin(115200); pinMode(ledPin, OUTPUT); // Connect to Wi-Fi WiFi.begin(ssid, password); while (WiFi.status() != WL_CONNECTED) { delay(1000); Serial.println("Connecting to WiFi..."); } Serial.print("IP address: "); Serial.println(WiFi.localIP()); Serial.println("Connected to WiFi"); } void loop() { if (WiFi.status() == WL_CONNECTED) { HTTPClient http; // Specify the URL to request String url = "http://" + ip + "/test-xml.php?user=1000&p=10"; // Send GET request int httpCode = http.begin(url); if (httpCode > 0) { int httpResponseCode = http.GET(); if (httpResponseCode == HTTP_CODE_OK) { // Get the response payload String payload = http.getString(); Serial.println("Response:"); Serial.println(payload); // Parse the XML response XMLDocument xml; xml.Parse(payload.c_str()); // Check if the second mod 2 is zero XMLElement* root = xml.FirstChildElement("root"); XMLElement* secondElement = root->NextSiblingElement("element"); int value = secondElement->IntAttribute("value"); if (value % 2 == 0) { digitalWrite(ledPin, HIGH); // Turn LED on Serial.println("LED turned on"); } else { digitalWrite(ledPin, LOW); // Turn LED off Serial.println("LED turned off"); } } else if (httpResponseCode == HTTP_CODE_NOT_FOUND) { Serial.println("HTTP request failed: Resource not found (404)"); } else if (httpResponseCode == HTTP_CODE_UNAUTHORIZED) { Serial.println("HTTP request failed: Unauthorized (401)"); } else if (httpResponseCode == HTTP_CODE_FORBIDDEN) { Serial.println("HTTP request failed: Forbidden (403)"); } else if (httpResponseCode == HTTP_CODE_INTERNAL_SERVER_ERROR) { Serial.println("HTTP request failed: Internal server error (500)"); } else { Serial.printf("HTTP request failed with error code: %d\n", httpResponseCode); } } else { Serial.println("HTTP request failed"); } // End the request http.end(); } // Wait for some time before making the next request delay(5000); } |
5 שלח את ערכי הסרבו והתקנת ספרייה לארדואינו דרך WIFI K test-xml.php?user=1000&p=10
הסרבו והלד מיצגים פתיחה וסגירה של שער
שים לב : חיבור לא נכון ישרוף את המעגל
1.3.1 הוסף סרבו למעגל
1.3.2 הוסף את הספריה לתוכנה בבסביבת ארדואינו
בתוכנת הארדואינו : בחר מנהל הסיפריות
מחרזות המשך – המרת מספרים
https://wokwi.com/projects/391611196455241729
|
1 2 3 4 5 6 7 8 9 10 11 12 13 14 15 16 17 18 19 20 21 22 23 24 25 26 27 28 29 |
#include <Arduino.h> void setup() { Serial.begin(9600); // Example character strings char intString[] = "127"; char negIntString[] = "-127"; char floatString[] = "3.14"; // Convert character strings to numbers int intValue = atoi(intString); int negIntValue = atoi(negIntString); float floatValue = atof(floatString); // Print the converted values Serial.print("Integer Value: "); Serial.println(intValue); Serial.print("Negative Integer Value: "); Serial.println(negIntValue); Serial.print("Float Value: "); Serial.println(floatValue); } void loop() { // Nothing here for a simple example } |
מחרוזות המשך sprintf
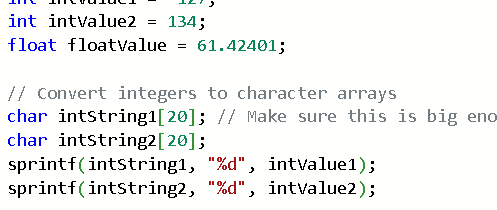
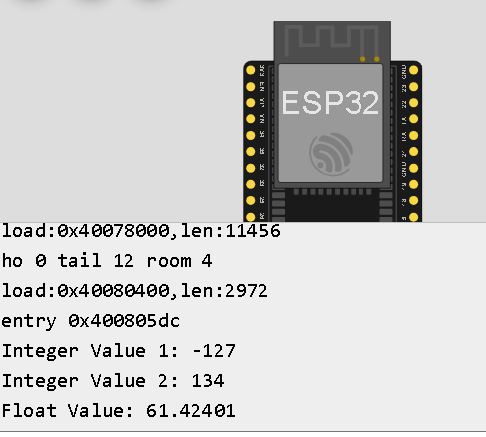
|
1 2 3 4 5 6 7 8 9 10 11 12 13 14 15 16 17 18 19 20 21 22 23 24 25 26 27 28 29 30 31 32 |
void setup() { Serial.begin(9600); // Example numbers int intValue1 = -127; int intValue2 = 134; float floatValue = 61.42401; // Convert integers to character arrays char intString1[20]; // Make sure this is big enough to hold your integer char intString2[20]; sprintf(intString1, "%d", intValue1); sprintf(intString2, "%d", intValue2); // Convert float to character array char floatString[20]; // Make sure this is big enough to hold your float sprintf(floatString, "%.5f", floatValue); // %.5f ensures 5 decimal places // Print the converted strings Serial.print("Integer Value 1: "); Serial.println(intString1); Serial.print("Integer Value 2: "); Serial.println(intString2); Serial.print("Float Value: "); Serial.println(floatString); } void loop() { // Nothing here for a simple example } |
6. חיישנים
חיישן טמפרטורה מסוג 10K@25℃ NTC thermistor
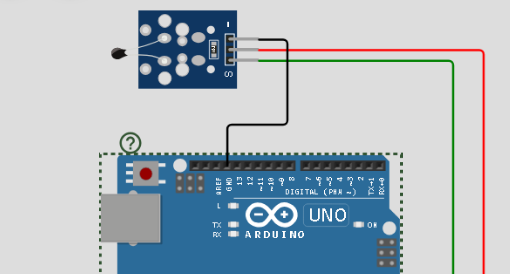
|
1 2 3 4 5 6 7 8 9 10 11 12 13 14 15 16 17 18 19 20 21 22 23 24 |
/** Basic NTC Thermistor demo Assumes a 10K@25℃ NTC thermistor connected in series with a 10K resistor. Copyright (C) 2021, Uri Shaked */ const float BETA = 3950; // should match the Beta Coefficient of the thermistor void setup() { Serial.begin(9600); } void loop() { int analogValue = analogRead(A0); float celsius = 1 / (log(1 / (1023. / analogValue - 1)) / BETA + 1.0 / 298.15) - 273.15; Serial.print("Temperature: A:"); Serial.print(analogValue); Serial.print(" T :"); Serial.print(celsius); Serial.println(" ℃"); delay(1000); } |
https://wokwi.com/projects/391609353582739457
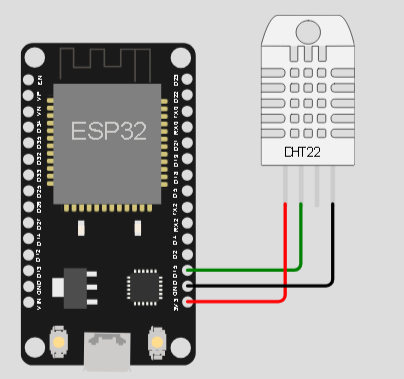
https://wokwi.com/projects/391610362657920001
|
1 2 3 4 5 6 7 8 9 10 11 12 13 14 15 16 |
const int DHT_PIN = 15; DHTesp dhtSensor; void setup() { Serial.begin(115200); dhtSensor.setup(DHT_PIN, DHTesp::DHT22); } void loop() { TempAndHumidity data = dhtSensor.getTempAndHumidity(); Serial.println("Temp: " + String(data.temperature, 2) + "°C"); Serial.println("Humidity: " + String(data.humidity, 1) + "%"); Serial.println("---"); delay(2000); // Wait for a new reading from the sensor (DHT22 has ~0.5Hz sample rate) } |
מנוע צעד – stepper-motor-example robotronix
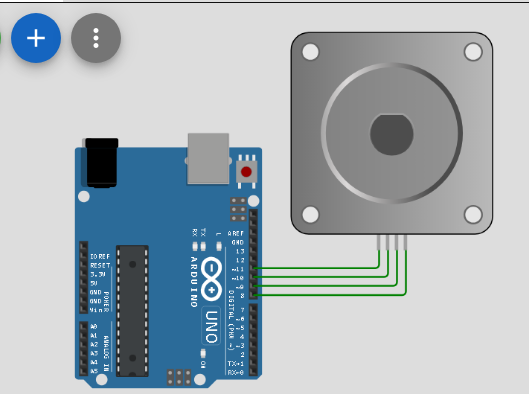

|
1 2 3 4 5 6 7 8 9 10 11 12 13 14 15 16 17 18 19 20 21 22 23 24 25 26 27 28 |
// Stepper motor on Wokwi! #include <Stepper.h> const int stepsPerRevolution = 200; // change this to fit the number of steps per revolution // for your motor // initialize the stepper library on pins 8 through 11: Stepper myStepper(stepsPerRevolution, 8, 9, 10, 11); void setup() { // set the speed at 60 rpm: myStepper.setSpeed(60); // initialize the serial port: Serial.begin(9600); } void loop() { // step one revolution in one direction: Serial.println("clockwise"); myStepper.step(stepsPerRevolution); delay(500); // step one revolution in the other direction: Serial.println("counterclockwise"); myStepper.step(-stepsPerRevolution); delay(500); } |
https://wokwi.com/projects/391609944554982401
מוסיקה אורגן
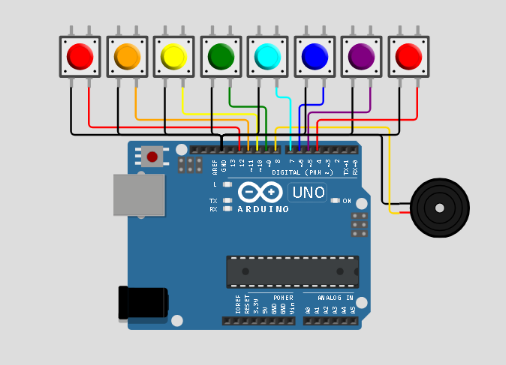
https://wokwi.com/projects/391609593910086657
|
1 2 3 4 5 6 7 8 9 10 11 12 13 14 15 16 17 18 19 20 21 22 23 24 25 26 27 28 29 30 31 32 33 34 35 36 37 38 39 40 41 42 |
/** Mini piano for Arduino. You can control the colorful buttons with your keyboard: After starting the simulation, click anywhere in the diagram to focus it. Then press any key between 1 and 8 to play the piano (1 is the lowest note, 8 is the highest). Copyright (C) 2021, Uri Shaked. Released under the MIT License. */ #include "pitches.h" #define SPEAKER_PIN 8 const uint8_t buttonPins[] = { 12, 11, 10, 9, 7, 6, 5, 4 }; const int buttonTones[] = { NOTE_C4, NOTE_D4, NOTE_E4, NOTE_F4, NOTE_G4, NOTE_A4, NOTE_B4, NOTE_C5 }; const int numTones = sizeof(buttonPins) / sizeof(buttonPins[0]); void setup() { for (uint8_t i = 0; i < numTones; i++) { pinMode(buttonPins[i], INPUT_PULLUP); } pinMode(SPEAKER_PIN, OUTPUT); } void loop() { int pitch = 0; for (uint8_t i = 0; i < numTones; i++) { if (digitalRead(buttonPins[i]) == LOW) { pitch = buttonTones[i]; } } if (pitch) { tone(SPEAKER_PIN, pitch); } else { noTone(SPEAKER_PIN); } } |
מסך 2.4 אינצ
spi
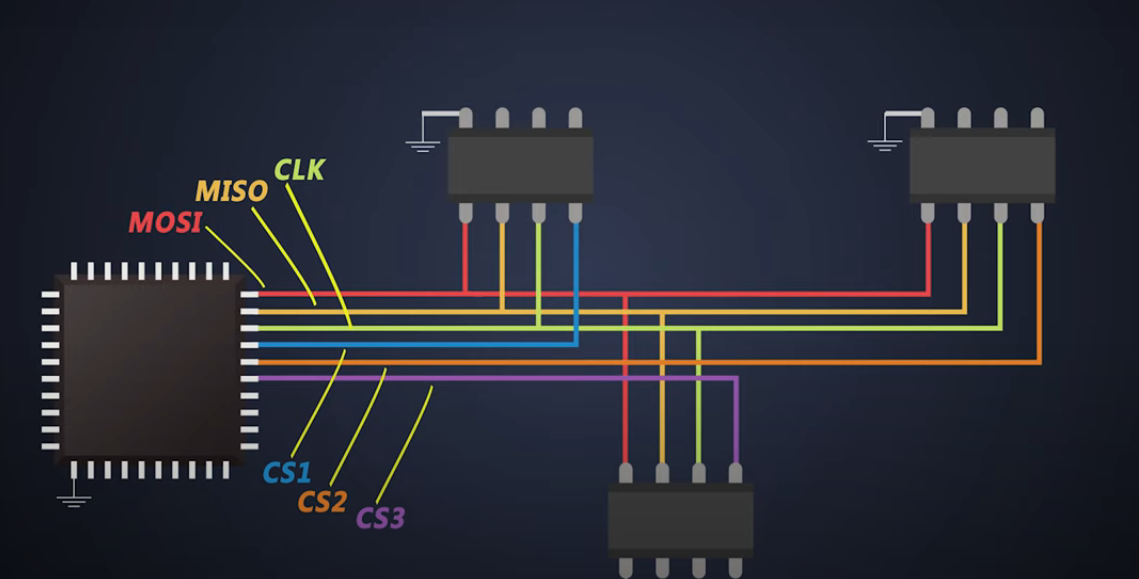
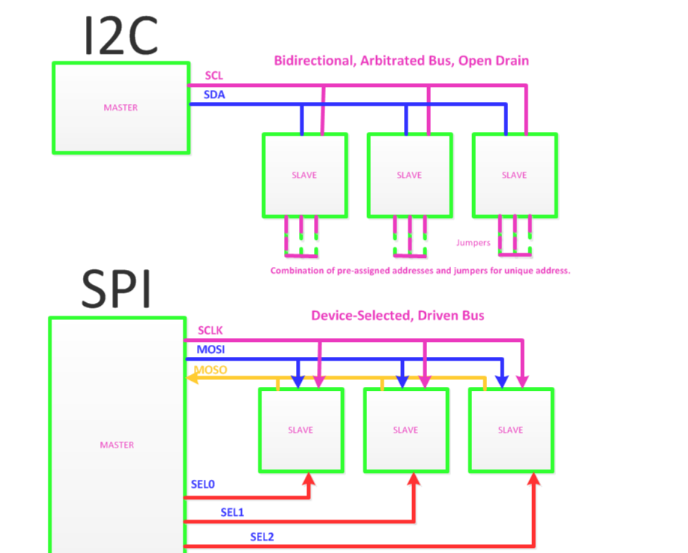
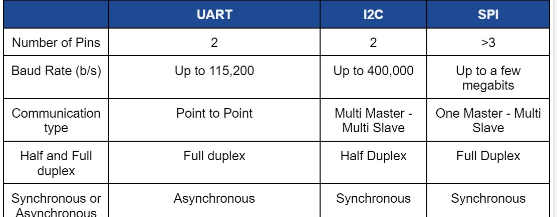
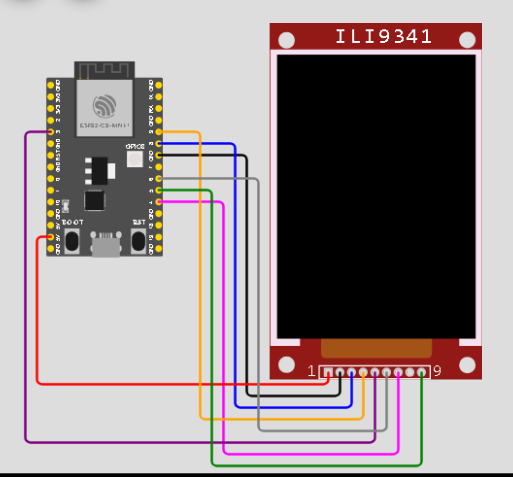
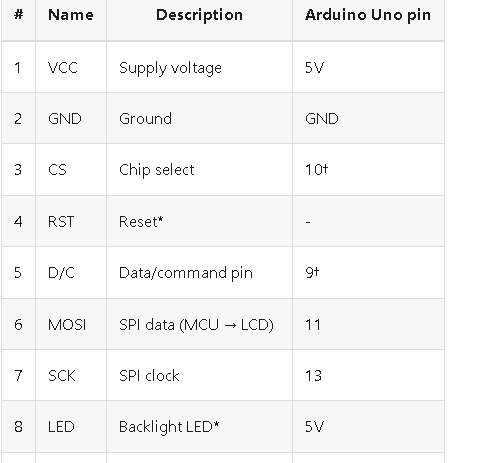
SPI – מסך 2.4 דרייבר ILI9341
https://wokwi.com/projects/391611667822716929
|
1 2 3 4 5 6 7 8 9 10 11 12 13 14 15 16 17 18 19 20 21 22 23 24 25 26 27 28 29 30 31 32 33 34 35 36 37 38 |
/* ESP32-C3 + ILI9341 TFT LCD Example robotronix.co.il https://wokwi.com/projects/391611667822716929 */ #include "SPI.h" #include "Adafruit_GFX.h" #include "Adafruit_ILI9341.h" #define TFT_DC 3 #define TFT_CS 8 Adafruit_ILI9341 tft = Adafruit_ILI9341(TFT_CS, TFT_DC); void setup() { tft.begin(); tft.setCursor(46, 120); tft.setTextColor(ILI9341_RED); tft.setTextSize(3); tft.println("ESP32-C3"); } const uint32_t colors[] = { ILI9341_GREEN, ILI9341_CYAN, ILI9341_MAGENTA, ILI9341_YELLOW, }; uint8_t colorIndex = 0; void loop() { tft.setTextSize(2); tft.setCursor(42, 164); tft.setTextColor(colors[colorIndex++ % 4]); tft.println("SPI works :-)"); delay(250); } |
https://wokwi.com/projects/391611667822716929
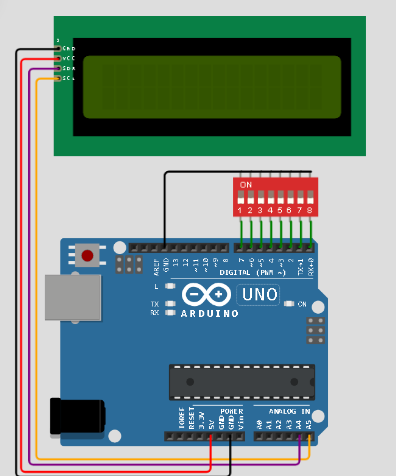
קריאת PORT PIND מסך 2×16 I2C
|
1 2 3 4 5 6 7 8 9 10 11 12 13 14 15 16 17 18 19 20 21 22 23 24 25 26 27 28 29 30 31 32 33 34 35 |
/** Arduino Uno PIND register demo https://wokwi.com/arduino/projects/314168546236039745 Copyright (C) 2021, Uri Shaked. */ #include <LiquidCrystal_I2C.h> LiquidCrystal_I2C lcd(0x27, 16, 2); void setup() { lcd.init(); lcd.backlight(); lcd.println("PIND value:"); pinMode(0, INPUT_PULLUP); pinMode(1, INPUT_PULLUP); pinMode(2, INPUT_PULLUP); pinMode(3, INPUT_PULLUP); pinMode(4, INPUT_PULLUP); pinMode(5, INPUT_PULLUP); pinMode(6, INPUT_PULLUP); pinMode(7, INPUT_PULLUP); } int value = -1; void loop() { if (PIND != value) { lcd.setCursor(6, 1); lcd.print(PIND); lcd.print(" "); value = PIND; } } |
https://wokwi.com/projects/391610844972524545
גיירוסקופ ואקסלומטר
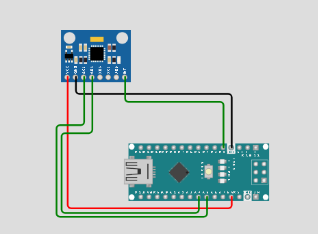

https://wokwi.com/projects/391607919403250689
העשרה בלבד
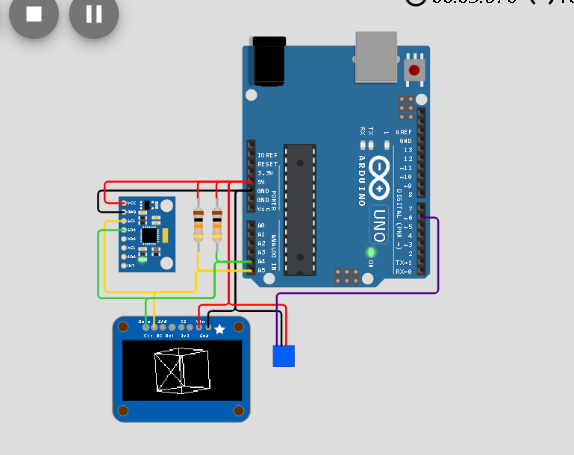
https://wokwi.com/projects/306115576172905024
esp32 גירוסקופ ואקסלומטר – MPU6050
יש להתקין את הספריה (יש לשים לב שלא מתנגש עם ספריות אחרות )

נריץ את הדוגמא : MPU6050_DMP6 – קוד דוגמא עבור MPU6050 שימוש ב ESP32
|
1 2 3 4 5 6 7 8 9 10 11 12 13 14 15 16 17 18 19 20 21 22 23 24 25 26 27 28 29 30 31 32 33 34 35 36 37 38 39 40 41 42 43 44 45 46 47 48 49 50 51 52 53 54 55 56 57 58 59 60 61 62 63 64 65 66 67 68 69 70 71 72 73 74 75 76 77 78 79 80 81 82 83 84 85 86 87 88 89 90 91 92 93 94 95 96 97 98 99 100 101 102 103 104 105 106 107 108 109 110 111 112 113 114 115 116 117 118 119 120 121 122 123 124 125 126 127 128 129 130 131 132 133 134 135 136 137 138 139 140 141 142 143 144 145 146 147 148 149 150 151 152 153 154 155 156 157 158 159 160 161 162 163 164 165 166 167 168 169 170 171 172 173 174 175 176 177 178 179 180 181 182 183 184 185 186 187 188 189 190 191 192 193 194 195 196 197 198 199 200 201 202 203 204 205 206 207 208 209 210 211 212 213 214 215 216 217 218 219 220 221 222 223 224 225 226 227 228 229 230 231 232 233 234 235 236 237 238 239 240 241 242 243 244 245 246 247 248 249 250 251 252 253 254 255 256 257 258 259 260 261 262 263 264 265 266 267 268 269 270 271 272 273 274 275 276 277 278 279 280 281 282 283 284 285 286 287 288 289 290 291 292 293 294 295 296 297 298 299 300 |
// I2C device class (I2Cdev) demonstration Arduino sketch for MPU6050 class using DMP (MotionApps v2.0) #include "I2Cdev.h" #include "MPU6050_6Axis_MotionApps20.h" //#include "MPU6050.h" // not necessary if using MotionApps include file // Arduino Wire library is required if I2Cdev I2CDEV_ARDUINO_WIRE implementation // is used in I2Cdev.h #if I2CDEV_IMPLEMENTATION == I2CDEV_ARDUINO_WIRE #include "Wire.h" #endif // class default I2C address is 0x68 // specific I2C addresses may be passed as a parameter here // AD0 low = 0x68 (default for SparkFun breakout and InvenSense evaluation board) // AD0 high = 0x69 MPU6050 mpu; //MPU6050 mpu(0x69); // <-- use for AD0 high /* ========================================================================= NOTE: In addition to connection 3.3v, GND, SDA, and SCL, this sketch depends on the MPU-6050's INT pin being connected to the Arduino's external interrupt #0 pin. On the Arduino Uno and Mega 2560, this is digital I/O pin 2. * ========================================================================= */ /* ========================================================================= NOTE: Arduino v1.0.1 with the Leonardo board generates a compile error when using Serial.write(buf, len). The Teapot output uses this method. The solution requires a modification to the Arduino USBAPI.h file, which is fortunately simple, but annoying. This will be fixed in the next IDE release. For more info, see these links: http://arduino.cc/forum/index.php/topic,109987.0.html http://code.google.com/p/arduino/issues/detail?id=958 * ========================================================================= */ // uncomment "OUTPUT_READABLE_QUATERNION" if you want to see the actual // quaternion components in a [w, x, y, z] format (not best for parsing // on a remote host such as Processing or something though) //#define OUTPUT_READABLE_QUATERNION // uncomment "OUTPUT_READABLE_EULER" if you want to see Euler angles // (in degrees) calculated from the quaternions coming from the FIFO. // Note that Euler angles suffer from gimbal lock (for more info, see // http://en.wikipedia.org/wiki/Gimbal_lock) //#define OUTPUT_READABLE_EULER // uncomment "OUTPUT_READABLE_YAWPITCHROLL" if you want to see the yaw/ // pitch/roll angles (in degrees) calculated from the quaternions coming // from the FIFO. Note this also requires gravity vector calculations. // Also note that yaw/pitch/roll angles suffer from gimbal lock (for // more info, see: http://en.wikipedia.org/wiki/Gimbal_lock) #define OUTPUT_READABLE_YAWPITCHROLL // uncomment "OUTPUT_READABLE_REALACCEL" if you want to see acceleration // components with gravity removed. This acceleration reference frame is // not compensated for orientation, so +X is always +X according to the // sensor, just without the effects of gravity. If you want acceleration // compensated for orientation, us OUTPUT_READABLE_WORLDACCEL instead. //#define OUTPUT_READABLE_REALACCEL // uncomment "OUTPUT_READABLE_WORLDACCEL" if you want to see acceleration // components with gravity removed and adjusted for the world frame of // reference (yaw is relative to initial orientation, since no magnetometer // is present in this case). Could be quite handy in some cases. //#define OUTPUT_READABLE_WORLDACCEL // uncomment "OUTPUT_TEAPOT" if you want output that matches the // format used for the InvenSense teapot demo //#define OUTPUT_TEAPOT #define INTERRUPT_PIN 2 // use pin 2 on Arduino Uno & most boards #define LED_PIN 13 // (Arduino is 13, Teensy is 11, Teensy++ is 6) bool blinkState = false; // MPU control/status vars bool dmpReady = false; // set true if DMP init was successful uint8_t mpuIntStatus; // holds actual interrupt status byte from MPU uint8_t devStatus; // return status after each device operation (0 = success, !0 = error) uint16_t packetSize; // expected DMP packet size (default is 42 bytes) uint16_t fifoCount; // count of all bytes currently in FIFO uint8_t fifoBuffer[64]; // FIFO storage buffer // orientation/motion vars Quaternion q; // [w, x, y, z] quaternion container VectorInt16 aa; // [x, y, z] accel sensor measurements VectorInt16 aaReal; // [x, y, z] gravity-free accel sensor measurements VectorInt16 aaWorld; // [x, y, z] world-frame accel sensor measurements VectorFloat gravity; // [x, y, z] gravity vector float euler[3]; // [psi, theta, phi] Euler angle container float ypr[3]; // [yaw, pitch, roll] yaw/pitch/roll container and gravity vector // packet structure for InvenSense teapot demo uint8_t teapotPacket[14] = { '$', 0x02, 0,0, 0,0, 0,0, 0,0, 0x00, 0x00, '\r', '\n' }; // ================================================================ // === INTERRUPT DETECTION ROUTINE === // ================================================================ volatile bool mpuInterrupt = false; // indicates whether MPU interrupt pin has gone high void dmpDataReady() { mpuInterrupt = true; } // ================================================================ // === INITIAL SETUP === // ================================================================ void setup() { // join I2C bus (I2Cdev library doesn't do this automatically) #if I2CDEV_IMPLEMENTATION == I2CDEV_ARDUINO_WIRE Wire.begin(); Wire.setClock(400000); // 400kHz I2C clock. Comment this line if having compilation difficulties #elif I2CDEV_IMPLEMENTATION == I2CDEV_BUILTIN_FASTWIRE Fastwire::setup(400, true); #endif // initialize serial communication // (115200 chosen because it is required for Teapot Demo output, but it's // really up to you depending on your project) Serial.begin(115200); while (!Serial); // wait for Leonardo enumeration, others continue immediately // NOTE: 8MHz or slower host processors, like the Teensy @ 3.3V or Arduino // Pro Mini running at 3.3V, cannot handle this baud rate reliably due to // the baud timing being too misaligned with processor ticks. You must use // 38400 or slower in these cases, or use some kind of external separate // crystal solution for the UART timer. // initialize device Serial.println(F("Initializing I2C devices...")); mpu.initialize(); pinMode(INTERRUPT_PIN, INPUT); // verify connection Serial.println(F("Testing device connections...")); Serial.println(mpu.testConnection() ? F("MPU6050 connection successful") : F("MPU6050 connection failed")); // wait for ready Serial.println(F("\nSend any character to begin DMP programming and demo: ")); while (Serial.available() && Serial.read()); // empty buffer while (!Serial.available()); // wait for data while (Serial.available() && Serial.read()); // empty buffer again // load and configure the DMP Serial.println(F("Initializing DMP...")); devStatus = mpu.dmpInitialize(); // supply your own gyro offsets here, scaled for min sensitivity mpu.setXGyroOffset(220); mpu.setYGyroOffset(76); mpu.setZGyroOffset(-85); mpu.setZAccelOffset(1788); // 1688 factory default for my test chip // make sure it worked (returns 0 if so) if (devStatus == 0) { // Calibration Time: generate offsets and calibrate our MPU6050 mpu.CalibrateAccel(6); mpu.CalibrateGyro(6); mpu.PrintActiveOffsets(); // turn on the DMP, now that it's ready Serial.println(F("Enabling DMP...")); mpu.setDMPEnabled(true); // enable Arduino interrupt detection Serial.print(F("Enabling interrupt detection (Arduino external interrupt ")); Serial.print(digitalPinToInterrupt(INTERRUPT_PIN)); Serial.println(F(")...")); attachInterrupt(digitalPinToInterrupt(INTERRUPT_PIN), dmpDataReady, RISING); mpuIntStatus = mpu.getIntStatus(); // set our DMP Ready flag so the main loop() function knows it's okay to use it Serial.println(F("DMP ready! Waiting for first interrupt...")); dmpReady = true; // get expected DMP packet size for later comparison packetSize = mpu.dmpGetFIFOPacketSize(); } else { // ERROR! // 1 = initial memory load failed // 2 = DMP configuration updates failed // (if it's going to break, usually the code will be 1) Serial.print(F("DMP Initialization failed (code ")); Serial.print(devStatus); Serial.println(F(")")); } // configure LED for output pinMode(LED_PIN, OUTPUT); } // ================================================================ // === MAIN PROGRAM LOOP === // ================================================================ void loop() { // if programming failed, don't try to do anything if (!dmpReady) return; // read a packet from FIFO if (mpu.dmpGetCurrentFIFOPacket(fifoBuffer)) { // Get the Latest packet #ifdef OUTPUT_READABLE_QUATERNION // display quaternion values in easy matrix form: w x y z mpu.dmpGetQuaternion(&q, fifoBuffer); Serial.print("quat\t"); Serial.print(q.w); Serial.print("\t"); Serial.print(q.x); Serial.print("\t"); Serial.print(q.y); Serial.print("\t"); Serial.println(q.z); #endif #ifdef OUTPUT_READABLE_EULER // display Euler angles in degrees mpu.dmpGetQuaternion(&q, fifoBuffer); mpu.dmpGetEuler(euler, &q); Serial.print("euler\t"); Serial.print(euler[0] * 180/M_PI); Serial.print("\t"); Serial.print(euler[1] * 180/M_PI); Serial.print("\t"); Serial.println(euler[2] * 180/M_PI); #endif #ifdef OUTPUT_READABLE_YAWPITCHROLL // display Euler angles in degrees mpu.dmpGetQuaternion(&q, fifoBuffer); mpu.dmpGetGravity(&gravity, &q); mpu.dmpGetYawPitchRoll(ypr, &q, &gravity); //[ yaw, pitch, roll ] yaw/pitch/roll container and gravity vector Serial.print("ypr2\t"); Serial.print(ypr[0] * 180/M_PI); // yaw Serial.print("\t"); Serial.print(ypr[1] * 180/M_PI); // pitch Serial.print("\t"); Serial.println(ypr[2] * 180/M_PI); // roll #endif #ifdef OUTPUT_READABLE_REALACCEL // display real acceleration, adjusted to remove gravity mpu.dmpGetQuaternion(&q, fifoBuffer); mpu.dmpGetAccel(&aa, fifoBuffer); mpu.dmpGetGravity(&gravity, &q); mpu.dmpGetLinearAccel(&aaReal, &aa, &gravity); Serial.print("areal\t"); Serial.print(aaReal.x); Serial.print("\t"); Serial.print(aaReal.y); Serial.print("\t"); Serial.println(aaReal.z); #endif #ifdef OUTPUT_READABLE_WORLDACCEL // display initial world-frame acceleration, adjusted to remove gravity // and rotated based on known orientation from quaternion mpu.dmpGetQuaternion(&q, fifoBuffer); mpu.dmpGetAccel(&aa, fifoBuffer); mpu.dmpGetGravity(&gravity, &q); mpu.dmpGetLinearAccel(&aaReal, &aa, &gravity); mpu.dmpGetLinearAccelInWorld(&aaWorld, &aaReal, &q); Serial.print("aworld\t"); Serial.print(aaWorld.x); Serial.print("\t"); Serial.print(aaWorld.y); Serial.print("\t"); Serial.println(aaWorld.z); #endif #ifdef OUTPUT_TEAPOT // display quaternion values in InvenSense Teapot demo format: teapotPacket[2] = fifoBuffer[0]; teapotPacket[3] = fifoBuffer[1]; teapotPacket[4] = fifoBuffer[4]; teapotPacket[5] = fifoBuffer[5]; teapotPacket[6] = fifoBuffer[8]; teapotPacket[7] = fifoBuffer[9]; teapotPacket[8] = fifoBuffer[12]; teapotPacket[9] = fifoBuffer[13]; Serial.write(teapotPacket, 14); teapotPacket[11]++; // packetCount, loops at 0xFF on purpose #endif // blink LED to indicate activity blinkState = !blinkState; digitalWrite(LED_PIN, blinkState); } } |
פלט

7. משקל – עבודה עם משקל
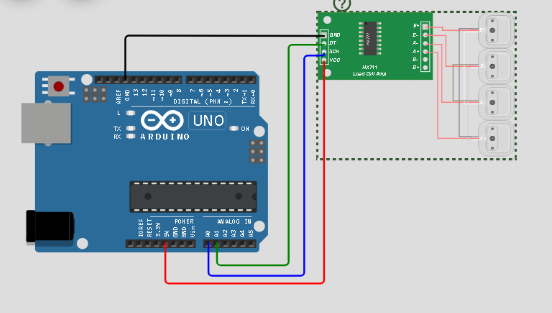

https://wokwi.com/projects/391608921338702849
