בינה מאלכותית RB14-09 : זיהוי פנים של תמונה YOLO8
yolov8x-face-lindevs.pt
yolov8x-face-lindevs.pt is a pre-trained deep learning model for face detection. It is built on top of the YOLOv8 framework, specifically the "x" or extra-large variant of YOLOv8. The model was prepared and released by the Lindevs project. It is provided in the .pt format, which means it is ready for use with the PyTorch backend and integrates directly with the Ultralytics YOLO library.
Why "YOLOv8x"
YOLOv8 comes in multiple sizes. Each size trades off between speed, memory usage, and accuracy.
-
"n" means nano. It is the smallest, fastest, but the least accurate.
-
"s" means small. Slightly bigger, with more accuracy but slower.
-
"m" means medium. Balanced between speed and accuracy.
-
"l" means large. More accurate than medium, but requires more compute power.
-
"x" means extra-large. This is the biggest version of YOLOv8. It achieves the highest accuracy but is slower and uses the most memory.
yolov8x-face-lindevs.pt is therefore the largest and most accurate version specialized for faces.
Training and purpose
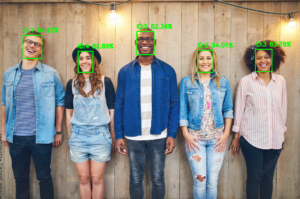
This model is not a general object detector. Instead, it is trained specifically to detect faces in images and videos. The training was performed on face datasets such as WIDER FACE, which include faces in many different conditions: various poses, angles, lighting, scales, and crowded scenes. Because of this training, the model can reliably detect faces in many real-world scenarios.
The output of the model is:
-
A bounding box that defines the rectangular area of the detected face, using coordinates
(x1, y1, x2, y2). -
A confidence score between 0 and 1 (or 0% to 100%) that indicates how sure the model is that the region is a face.
Advantages of the model
-
Ready to use immediately without training.
-
Specialized for face detection, so it is usually more accurate for this task than general YOLO models.
-
Works well across many environments and conditions because of its training data.
-
Easy integration with Ultralytics YOLO library using
model = YOLO("yolov8x-face-lindevs.pt").
|
1 2 3 4 5 6 7 8 9 10 11 12 13 14 15 16 17 18 19 20 21 22 23 24 25 26 27 28 29 30 31 32 33 34 35 36 37 38 39 40 41 42 43 44 45 46 47 48 |
import cv2 from ultralytics import YOLO import os # --- Model and image path --- model_path = r"D:\temp\yolov8x-face-lindevs.pt" image_path = r"D:\temp\face1.jpg" output_path = r"D:\temp\face1_detected.jpg" if not os.path.exists(model_path): raise FileNotFoundError(f"Model not found: {model_path}") if not os.path.exists(image_path): raise FileNotFoundError(f"Image not found: {image_path}") # --- Load YOLOv8 face model --- model = YOLO(model_path) # --- Load image --- image = cv2.imread(image_path) if image is None: raise FileNotFoundError(f"Could not open image: {image_path}") # --- Run detection --- results = model.predict(source=image, conf=0.25, device="cpu", verbose=True) # --- Draw boxes + confidence --- face_id = 0 for r in results: for box, score in zip(r.boxes.xyxy, r.boxes.conf): face_id += 1 x1, y1, x2, y2 = map(int, box) conf_percent = score.item() * 100 # Draw rectangle cv2.rectangle(image, (x1, y1), (x2, y2), (0, 255, 0), 2) # Label with ID + confidence cv2.putText(image, f"ID:{face_id} {conf_percent:.2f}%", (x1, y1 - 10), cv2.FONT_HERSHEY_SIMPLEX, 0.6, (0, 255, 0), 2) # --- Save and show result --- cv2.imwrite(output_path, image) print(f"Detection complete. Saved result at: {output_path}") cv2.imshow("Face Detection", image) cv2.waitKey(0) cv2.destroyAllWindows() |
-
with an error message.
4. Load the YOLO model
-
Loads the pre-trained YOLOv8 face detection model into memory.
-
This model knows how to detect faces because it was already trained on a face dataset.
5. Load the image
-
Reads the image from disk into a NumPy array (so OpenCV can process it).
-
If the image cannot be opened, stop with an error.
6. Run face detection
-
source=image→ run detection on the loaded image. -
conf=0.25→ minimum confidence = 25%. If YOLO is less sure than that, ignore it. -
device="cpu"→ force detection to run on CPU (useful if you don’t have GPU). -
verbose=True→ print detection progress/details to the console.
7. Process detections
-
r.boxes.xyxy→ list of bounding box coordinates for each face. -
r.boxes.conf→ confidence scores (how sure the model is). -
Each detected face gets an
ID(number). -
Coordinates
(x1, y1, x2, y2)describe the rectangle: top-left corner (x1, y1), bottom-right corner (x2, y2). -
conf_percentconverts confidence into % (e.g. 0.98 → 98%).
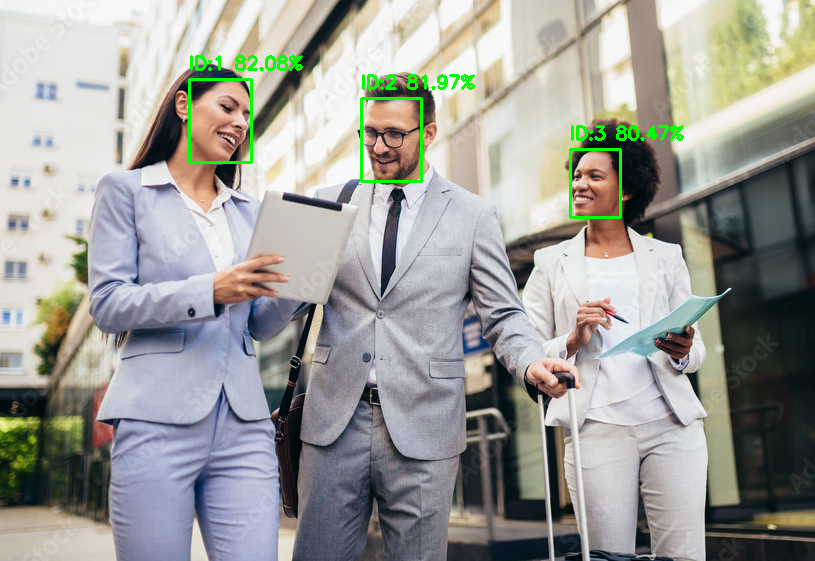
8. Draw rectangle + label
-
cv2.rectangle→ draws a green box around the detected face. -
cv2.putText→ writes “ID:1 98.50%” above the box.
9. Save and show results
-
Saves the modified image (with boxes) to disk.
-
Prints the save location.
-
Opens a window to display the image.
-
cv2.waitKey(0)waits for a key press. -
cv2.destroyAllWindows()closes the window.
✅ What the program does in one line:
Loads a pre-trained YOLOv8 face model, detects faces in face1.jpg, draws boxes with confidence %, saves the result to disk, and shows it on screen.